We've been working with Server-Side Tagging implementations for several years now and have noticed that one temptation often lurks with customers: wanting to measure everything. It's like getting a new gadget and wanting to try all the buttons. But as with many things in life, less is more. In this article, we explain what a tagging plan is, why it is necessary for your Server-Side Tagging setup, and how to set it up effectively without drowning in a sea of data.
What is a tagging plan?
A tagging plan is a structured list in which you record what events (events) you want to measure on your Web site. It forms the blueprint for your digital tracking strategy and ensures that you start collecting the data you need. So in the tagging plan, you specify which site interactions of your visitors you want to measure and share with your marketing and analytics platforms.
Events vs. site interactions
First, let's clarify two important concepts:
Site interactions: These are the actions users perform on your Web site, such as clicking a button, filling out a form, viewing a page or completing a purchase.
Events: These are the data units you send to your analytics and marketing platforms when a site interaction occurs. Along with these data units are sent the necessary user and marketing information so that your platforms know which user and from which session the event originated.
In addition to the standard information associated with an event, such as marketing and user IDs, an event can also contain parameters that provide additional context about exactly what happened. With a button-click, for example, you might want to know which button was clicked, on which page it happened, or what text the clicked button contains.
Why are events used?
Analytics and marketing platforms such as Google Analytics 4, Meta Ads and Google Ads work with events because they provide a flexible way to understand user interactions. By measuring events, these platforms can:
- Analyze user behavior: How do visitors navigate through your site? Where do they drop out?
- Conversions tracking: Which actions lead to desired outcomes such as purchases or leads?
- User segmentation: Which visitors performed (or did not perform) certain actions?
All of these platforms use the same designations for the standard site interactions. So while you will see differences between the naming that Meta Ads uses and that GA4 uses, they both amount to the same thing and both platforms know exactly what site interaction happened. You can find those naming differences between GA4 and Meta Ads in a table on our help page.
Hence, we also always recommend using a default event name if possible. That's because your analytics and marketing platforms cannot decipher what custom event names mean, what type of site interaction it is and how high the threshold is for the visitor to perform that site interaction.
The purpose of measuring events
There are two main reasons to measure events:
1. Analysis: You want to understand your visitors' behavior. For example, for an e-commerce site, the typical customer journey is: Landing page > View category > View product > Add product to cart > Start checkout > Complete purchase.
For a lead generation site, this journey is different, but just as important to understand. By mapping these steps, you can see where users drop out so you know where you can optimize to improve conversion rates.
2. Marketing: Events are crucial to your marketing efforts. That's because you use them to measure your campaign effectiveness. You want to know if your campaigns are producing conversions, whether they are purchases or leads. Your online advertising algorithms try to optimize your campaigns for the conversion you set.
You can also use events for retargeting when you want to retarget specific user groups, such as people who have placed products in their cart but have not paid. You will then need to send an 'add_to_cart' and 'purchase' event to your marketing channel so that such a user group can be created and populated. Indeed, this user group is defined by visitors who triggered the 'add_to_cart' event in their session, but not the 'purchase' event.
.png)
The pitfall of excessive tagging
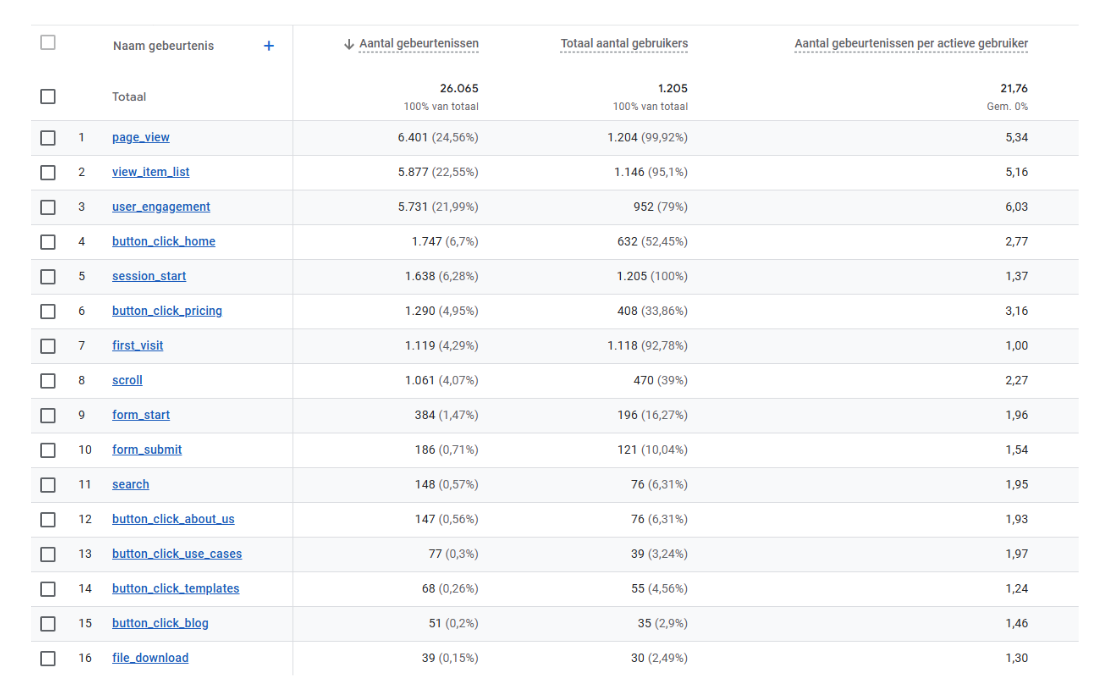
One of the biggest mistakes we see at AdPage is that our users want to measure way too much. We received tagging plans where every button and every page on the website had to trigger a separate event. There were also dozens of different forms on different pages all linked to different online campaigns. This is problematic for several reasons:
- Clutter: How do you remember what all those 50+ events mean?
- Inefficiency: You make your implementation unnecessarily complex.
- Data overload: Your GA4 reports become a mess you can't make sense of.
A smarter alternative
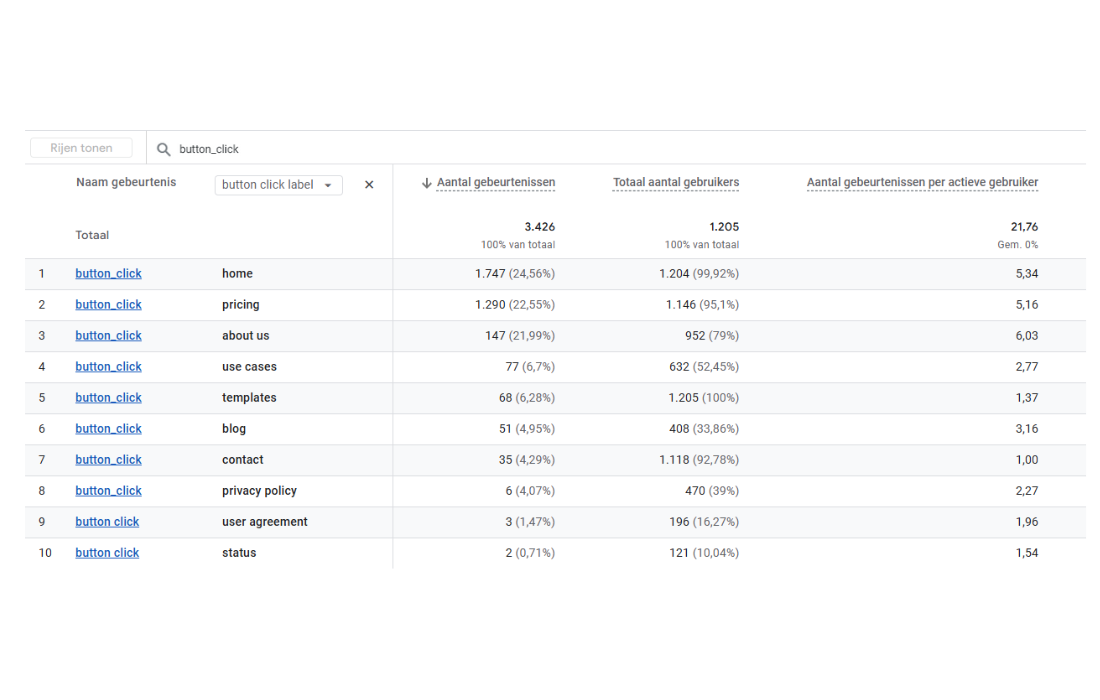
Instead of creating a separate event for each button or form, you can use one event with parameters. For all the matching site interactions you want to measure, you can attach dimensions to that one event. With that, you can always distinguish between different site interactions without making your GA4-property a cluttered puzzle.
Bad approach:
- homepage_contact_button_click
- product_page_buy_button_click
- about_us_contact_button_click
- ... (dozens more button clicks)
- contact_form
- acquaintance_form
- offer_form
- brochure_form
Better approach:
- button_click (with parameters: button_name, page_location)
- generate_lead (with parameters: form_id, page_location)
In your reports you will then see only two events ('button_click' & 'generate_lead') and you can filter by the parameter "button_name" or "form_id" to analyze the specific site interaction.


How do you put together an effective tagging plan?
1. Start with your business goals. Ask yourself: what do I want to achieve with my Web site? Generate sales or collect leads?
2. Identify your critical conversions. These are the main goals of your Web site, for example:
- For e-commerce: purchases (purchase)
- For lead generation: form submissions (generate_lead)
3. Map the customer journey. What steps does a user take before converting? These micro-conversions are also important to measure.
4. Choose default events whenever possible. Use GA4's default events (such as view_item, add_to_cart, begin_checkout) when applicable. These are directly integrated with reports.
5. Keep it simple! With each event, ask yourself, "Am I really going to use this data?" If not, leave it out.
The AdPage onboarding process
At AdPage, we've developed a structured onboarding process to help you create an effective tagging plan. Here's how it works:
Step 1: eCommerce or Leadgen?
In our onboarding, we first ask you to make a fundamental choice: is your website about e-commerce or lead generation?
eCommerce: If you sell products on your website, choose this option. We will then automatically set all default eCommerce events (provided they are present in your dataLayer):view_item_list (category view)view_item (product view)add_to_cartbegin_checkoutpurchase
Leadgen: If your website is focused on generating leads, choose this option. You will then have access to advanced Leadgen tracking with detailed customer data.
Step 2: Define custom events
After your basic selection, you can add custom events:
For eCommerce websites, this is optional, but can be useful for specific interactions not covered by standard e-commerce events.
Leadgen websites require at least one custom event, usually the generate_lead event for form submissions.
How do you fill out a custom event?
When creating a custom event, you will be asked for the following information:
- Name: The name of your event. Use a clear, descriptive name such as generate_lead, newsletter_signup or download_whitepaper. Preferably use GA4's default event names whenever possible.
- Description: Here you explain where the site interaction can be found. For example, "Contact form on the contact page" or "Newsletter subscription form in the footer of each page."
- Dimension: These are the additional parameters you want to give to the event so you can filter for it in your marketing or analytics channel. For example form_id to know which form was filled out or download_name to track which whitepaper was downloaded.
- Destination: Here you specify which platforms (besides GA4) the event should be sent to. Think Meta Ads or Google Ads for conversion tracking and remarketing.
- Mark as conversion event: Check this if the event represents an important conversion, such as a lead or a purchase.
.png)
Custom event example: generate_lead
- Name: generate_lead
- Description: contact form on the contact page: domainname.co.uk/contact & demo request form on the demo page: domainname.co.uk/demo
- Dimension: form_id (to distinguish between different forms)
- Destination: GA4, Meta Ads, Google Ads
- Conversion event: Yes
With this approach, you have one clear conversion event (generate_lead) with a parameter (form_id) to distinguish between different types of leads, rather than separate events for each form.
Conclusion
A good tagging plan is not about quantity, but quality. By strategically choosing which events to measure and using parameters, you keep your data clear and actionable. At AdPage, we're happy to help you create an effective tagging plan as part of our Server-Side Tagging implementation. Our onboarding is specifically designed to make this process as easy as possible, so you can quickly get started with relevant and actionable data. Because ultimately, you don't want data overload, you want insights that help you make better decisions.


.png)

.png)
