If you are reading this blog article, it probably means that you are already using a Server-Side Tagging setup. This article is written just for you, so you can look up any questions you may have about this tracking method now or in the future. You may want to check certain results in the first few weeks after setup, or you may want to know what specific notifications in Google Ads or your Meta Ads mean, for example. This article will help you step by step through those questions.
We've listed all the common questions and topics for you. Whether you want to know more about how Server-Side Tagging works, how to apply first-party data in your marketing strategy, or how to minimize error margins in your tracking; everything is covered in detail here. Because not every section or platform may be equally relevant to you, we've organized the article conveniently. You can easily navigate to the sections that apply to your situation on the left side of the screen (if you are viewing this article on mobile, you can find the navigation above the article). This makes it easy to find exactly the information you need without scrolling through unnecessary details.
You can also easily find the content you need in our help desk via the aftercare category by topic.
This blog article is useful not only for now, but also for later. For example, if you see a notification in one of your ad platforms after a few months, you can quickly look back and see how to fix it.
In short, use this article as a reference and tool to ensure that your Server-Side Tagging setup continues to function smoothly and your marketing platforms continue to perform optimally. We also provide some tips at the end of this article on how to leverage the first-party data collected across your various platforms to optimize your website and online marketing.
What is Server-Side Tagging?
Server-Side Tagging is an advanced method for tracking and analyzing Web site traffic. Traditionally, Web sites would place third-party tracking pixels in a visitor's browser, allowing the companies behind the tracking pixels to collect and send data. You, as the first party, then allow a third party on your site to collect data about your visitors. With Server-Side Tagging, this data collection goes through a server on the same domain as the Web site. So you no longer give those third parties the ability to track your site visitors, but you are the first party responsible for collecting this data and you get to choose what you share with which analytics or marketing platforms. As long as you indicate this in your cookie and privacy policy and give visitors the option via the cookie banner to refuse tracking for marketing and analytical purposes.
The main reason to switch to a first-party tracking setup, besides enforcing AVG and ePrivacy laws, is because third-party tracking has become too inaccurate. As of 2021, accurate tracking of your site visitors is no longer possible. In fact, Safari and Firefox browsers have started using tracking prevention methods to ensure the privacy of their users.
.png)
Google has also indicated back in 2021 to implement this for all Google Chrome users as well (as you read this, Google may still not have implemented this as they have moved that deadline many times). In addition to announcing tracking prevention in Google Chrome, Google also switched from Universal Analytics to Google Analytics 4 and are developing capabilities in their Privacy Sandbox to still ensure a functioning advertising platform without third-party cookies in the form of Google Ads.
Want to know more about the end of third-party cookies and what the (near) future looks like? Then check out this blog article on the end of third-party cookies.
Server-Side Tagging gives Web site owners more control over what data is collected and what platforms it is sent to. But that also ensures that you as a website owner, or as a marketer working for websites, are expected to have much more technical knowledge to maintain a first-party tracking setup.
The Server-Side Tagging communication flow; From site interaction to an event in my marketing or analytics channel
The visuals below explain as easily as possible how events enter marketing and analytics channels based on the site interactions a site visitor has. In doing so, we try to make as clear as possible what is involved in a Server-Side Tagging setup versus Third-Party Pixels or Client-Side Tagging.
Third-Party Pixels can be placed on your site giving you access to third-party vendors to create their own events based on site interactions:
.png)
With Client-Side Tagging, you place a Google Tag Manager script on your site so that you yourself can specify in a Google Tag Manager web container which events can be created based on site interactions. These events are sent from the web container, from the user's browser, directly to the platforms.
.png)
With Server-Side Tagging, events are still created in a Google Tag Manager web container, but are sent towards a server associated with the main domain. On a Google Tag Manager server container, you can then check what events are coming in to the server, and thanks to the Google Tag Manager server container, the events are forwarded to the appropriate platforms.
.png)
So your marketing and analytics channels receive a lot of different events from you, but how do they process this so that results appear in your campaign overview and reports populate in your Google Analytics? That's because there are certain parameters attached to those events that can be used to recognize users, sessions and their origins. Some of these parameters are set on the Google Tag Manager web container, and some parameters are automatically populated by the type of tag configuration being used. Want to learn more about event parameters and how visitors are recognized by different platforms? Then check out our blog article on conversion attribution.
Items to check after initial implementation
After your implementation of Server-Side Tagging, there are a number of components you need to keep an eye on. Your marketing and analytics channels are now receiving data in a different way, so there are a number of steps you need to take to check that everything is coming in and being processed properly.
Google Analytics 4
Google Analytics 4 is the most widely used analytics platform on the Internet. In GA4, you have the ability to see your collected data in standard manageable reports, charts and tables. GA4 creates those reports, charts and graphs based on the data they receive and for this they use some standard rules. So if you want to have a clear overview of your site visitors and their visitor journey you will have to follow GA4's rules.
With a Server-Side Tagging tracking setup through Google Tag Manager, GA4 configuration tags are already being used so you're already sending the data through in a way so GA4 can process it as clearly as possible. Only there are some parts that have to do not with how the data is sent, but how the data is collected in the first place. So after a Server-Side Tagging implementation, you need to analyze a number of parts in GA4 to conclude that there is still something lacking in your tracking setup. These are the following three components:
Number of conversions measured
After a Server-Side Tagging implementation, you will need to analyze how accurate the number of measured conversion events are. You are technically responsible for measuring the number of conversions that occur on your site now that you are collecting first-party data, but even so, another party such as AdPage may have set up the measurement of this through Google Tag Manager.
Keep in mind that it is virtually impossible to measure 100% of your conversions. Due to cookie-rejecting visitors, privacy browsers and script complications, you can only measure 100% of your conversions with the help of webhooks.
To check the number of conversion events measured in GA4, go to the GA4 report called "Events.
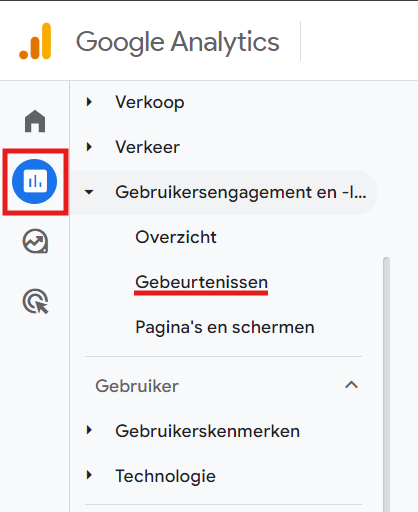
Here you get to see an overview of all events collected by GA4 in the form of a graph and a table. On the top right of the graph you have the option to adjust the date range of the period you want to check. If you want to compare the number of conversions from when Server-Side Tagging is live, then select the date range the day after the implementation up to and including yesterday.

Above the table you have a search bar that allows you to select a specific term or event name. Enter the name of your conversion event here. 'purchase' is the conversion name at eCommerce webshops and often 'generate_lead' is the conversion name at Leadgen sites.
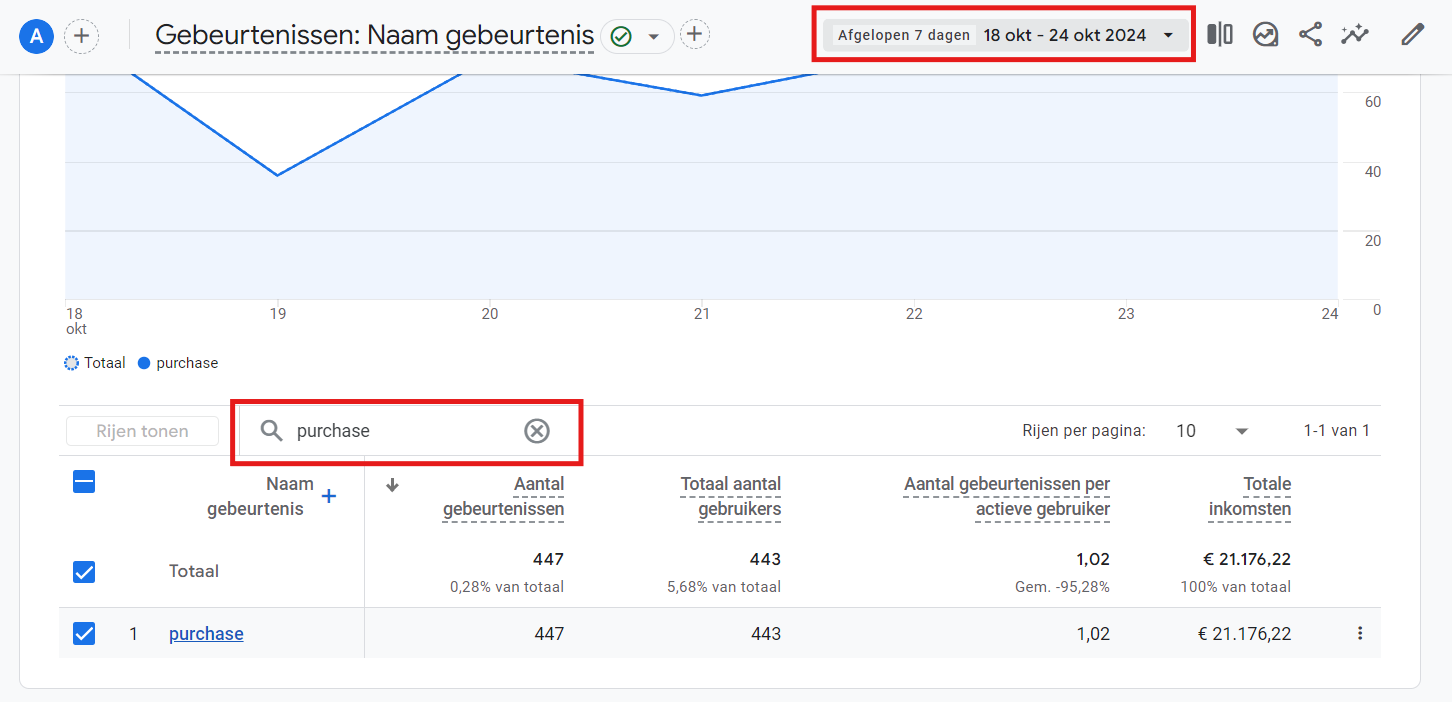
So now you have an overview of the number of conversion events received. You can compare these measured conversions with the actual number of conversions in the backend of your site, i.e. the number of orders made on the web shop or the number of forms filled out. The error margin between measured events and actual number of conversions is something you want to see as low as possible. Should there be huge differences in this, you will have to investigate where this large error margin can come from and whether this can be tracked more accurately.
Attributions of conversions
Now that you have an overview of the number of measured conversions you naturally want to know from which channels or campaigns these visitors came who proceeded to conversion. From a tracking perspective you at least want to make sure that all your visitors are assigned to a channel, if GA4 cannot assign your converting visitor and their conversion event GA4 indicates that that conversion is'Unassigned'.
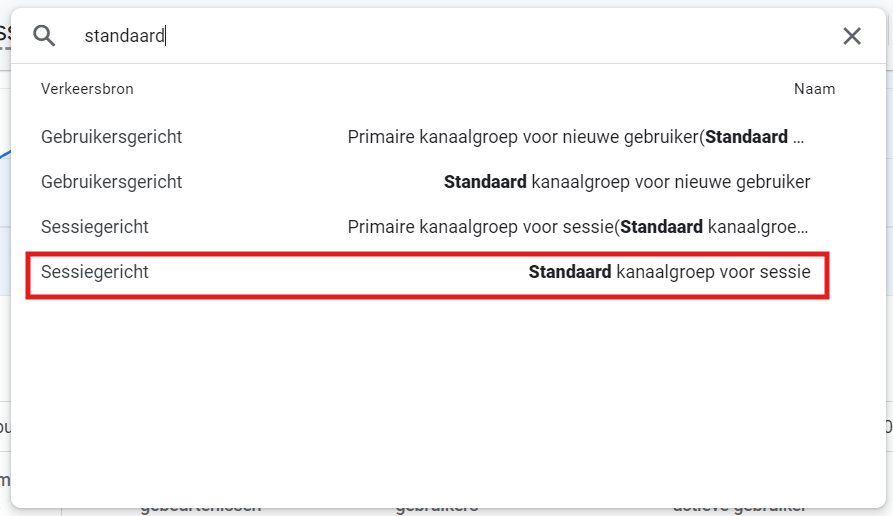
To check this, click on the blue plus next to "Event Name. This allows you to add an extra dimension to your table.

The additional dimension you want to add is "Default Channel Group for Session.
What you don't want to see is the problem below that many conversions are "Unassigned.
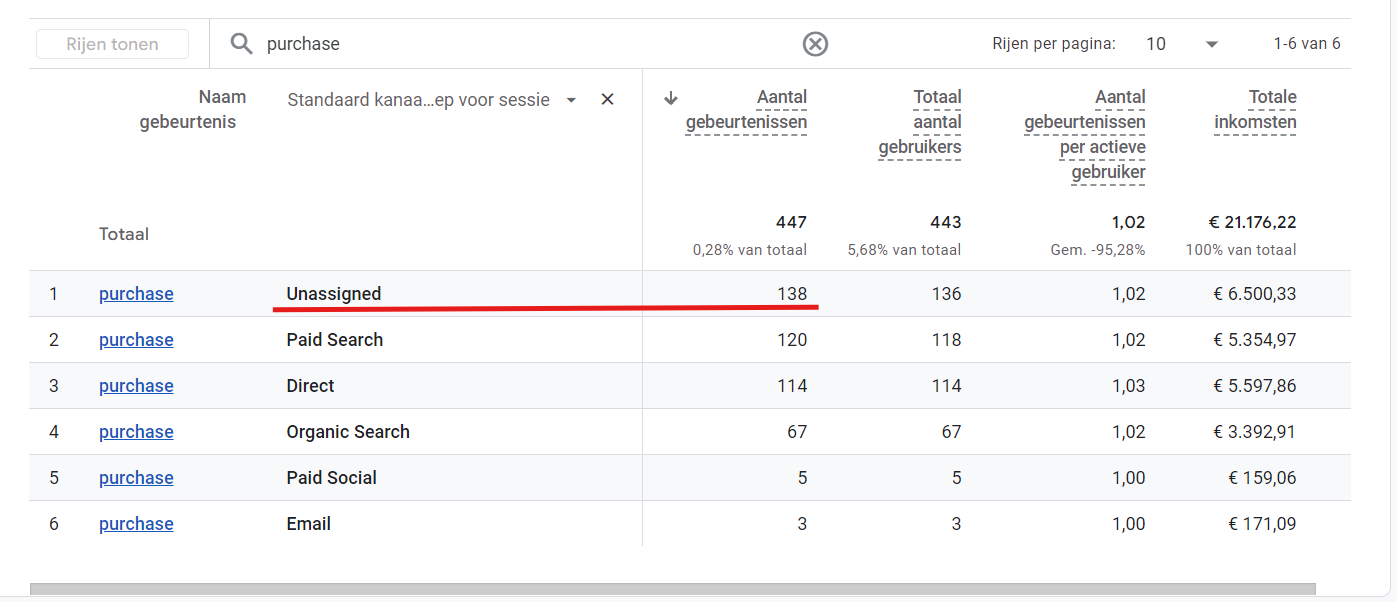
To make sure it's a problem with your tracking setup and not your use of UTM parameters, you can check by replacing the extra dimension 'Default channel group for session' with 'Session source/medium'.

Then when you see that all the 'Unassigned' conversions are actually caused by users coming to your site from weird sources/mediums, you know it's a UTM parameter issue. This is because if GA4 cannot decipher from which source/medium your visitor came to the site, this will also be placed under 'Unassigned'. Only '(not set)' is really unassignable by GA4 and might be cookie-rejecting visitors in the case of webhooks.
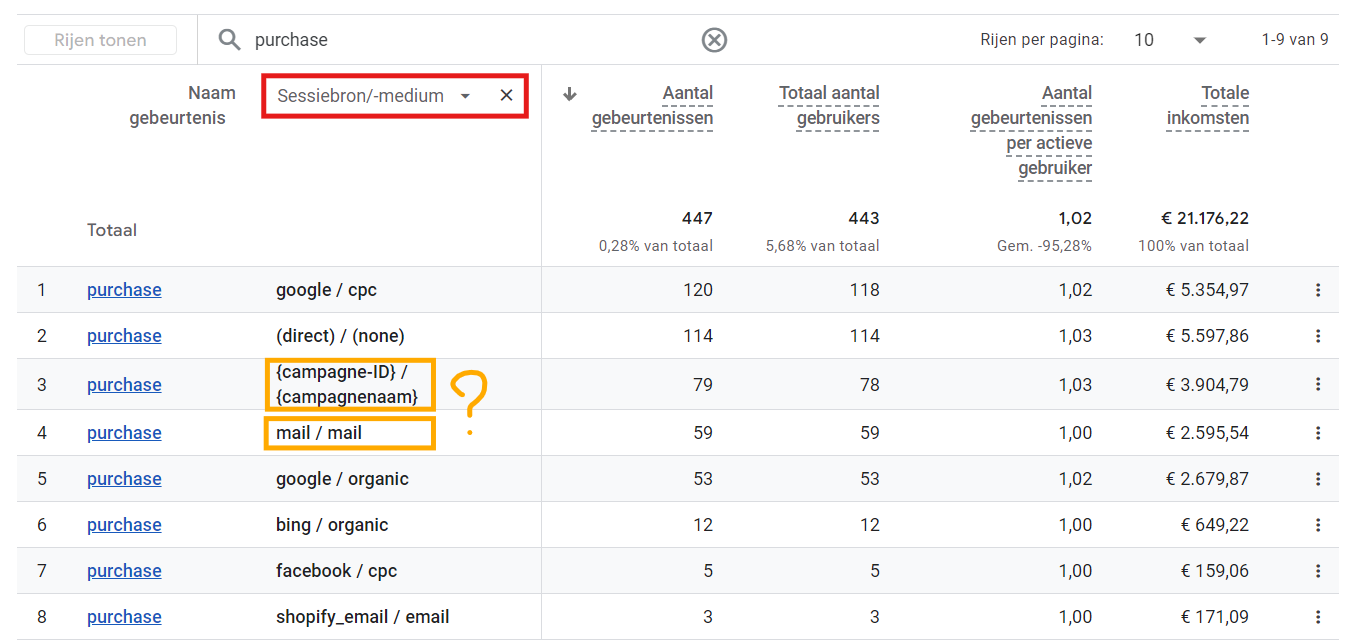
Attributions of your site traffic
In addition to assigning your visitors, you also want to see a clear overview of where all your visitors are coming from, not just the converting ones. You do that by going to the "Traffic Acquisition" report within GA4.
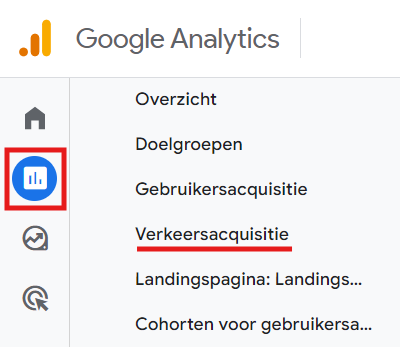
There you can see that the default dimension used by GA4 is 'Primary Channel Group for Session'. In the table, you want to see that the percentage of 'Unassigned' is less than 10% of the total number of visitors.
Again, make sure you have the date range on day after Server-Side Tagging implementation up to and including yesterday. And keep in mind that GA4 has a data processing period of 24 to 48 hours, so yesterday's data may not have been fully processed yet. In the morning, yesterday's percentage of Unassigned traffic is always higher than in the late afternoon.
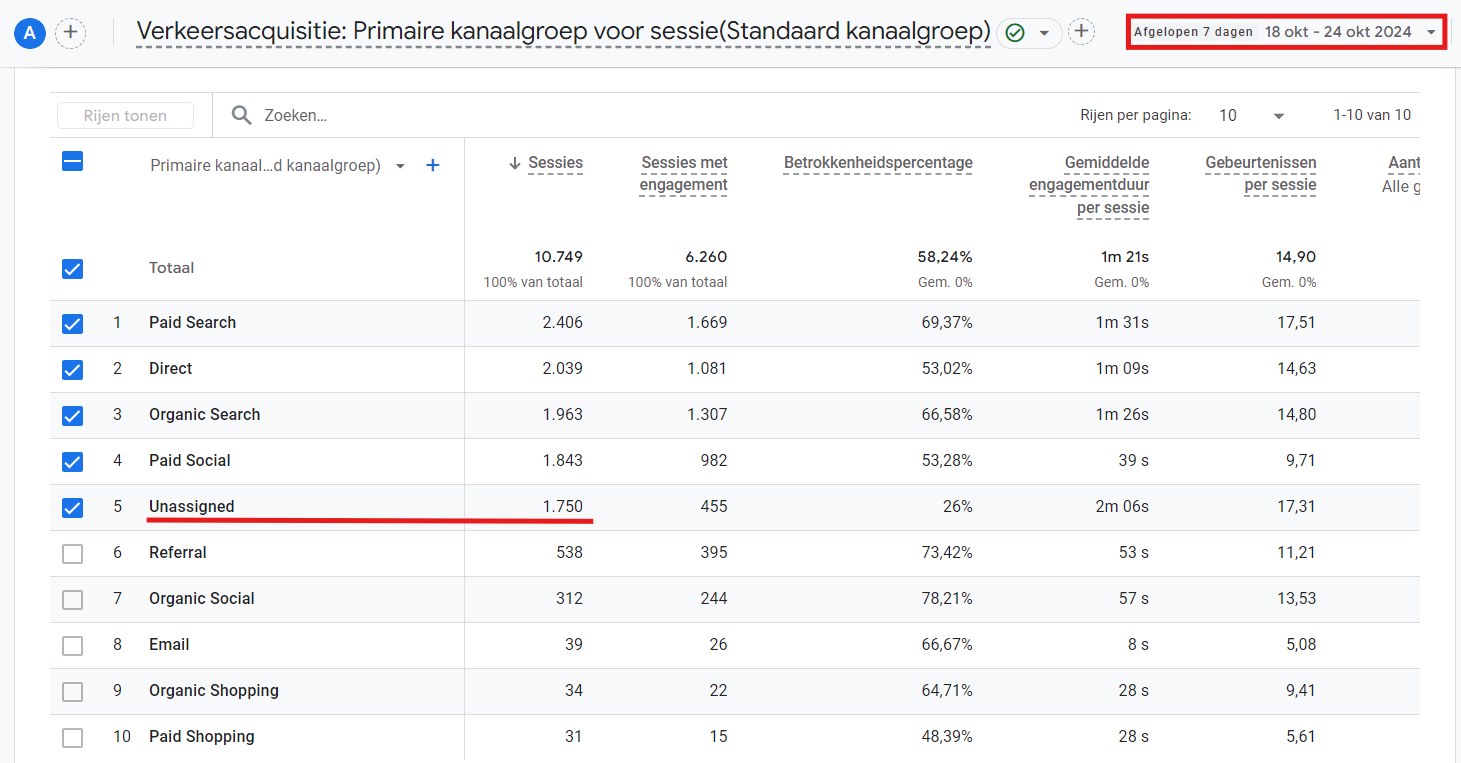
In the above example, you can see that the percentage unassigned is 16.28%. But here we also include yesterday's data, and we are doing this based on 'Channel Groups' and not 'Session Source/Medium'. If we exclude yesterday's day and take the 'Session Source/Medium' dimension we see a percentage of 6.38% which is a healthy percentage.
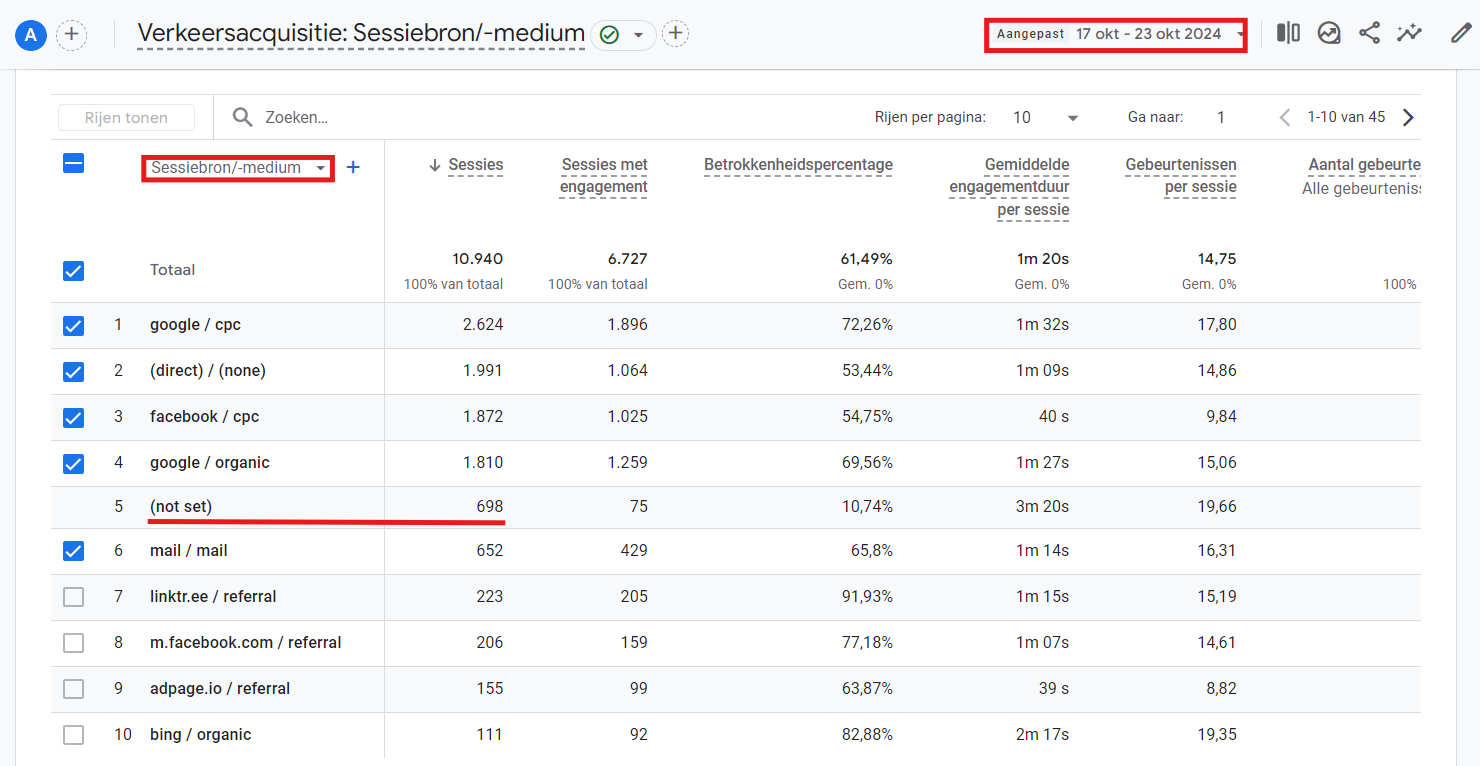
If any of the above tests have caused unsuccessful results, you can find possible solutions under the heading "Common Problems by Platform. You can also find more information about the reports within GA4 and what conclusions you can draw from those reports under the heading "How to make the best use of first-party data.
Meta Ads
Meta Ads is one of the most popular online marketing platforms. The Meta Ads algorithm is very dependent on the data they collect from their own platform, as well as the first-party data you provide.
If Meta Ads shows your ad to 400 Facebook or Instagram users and 25 people click on this ad, the Meta Ads algorithm has data on what type of user is interested in your product, service or ad. But if Meta can also collect the data on which of those 25 clicking users actually convert and which ones leave your site immediately, they have an even clearer picture of who your ideal target audience is that they can show your ads to.
If you have tracking set up for Meta Ads via Server-Side Tagging, you are constantly sending events, filled with parameters, to the Meta Event Manager. Even when you don't have ads running. So the Meta Event Manager will also receive events from your organic visitors, but in your Meta Ads view, you will only be able to see the events and conversions of visitors who landed on your site through a Meta Ads campaign.
Meta Ads can determine per which user came to your site thanks to one of their campaigns by the events your tracking setup sends to the Meta Event Manager. In fact, each event can contain either an fbc or an fbp parameter. The fbc parameter is filled with an identifier that a user gets when they click on a campaign, which is why it is also called the Facebook Click ID. The fbp parameter is filled with an identification number that anyone with a Facebook, Instagram or Whatsapp account has, this is your Facebook Profile Code. If you want more information on how Meta Ads can recognize visitors who have interacted with your campaigns, check out our blog article on conversion attribution.
What do you check in Meta Event Management?
There are two items that you may check after your Server-Side Tagging implementation goes live. Those are the alerts issued by Meta Event Management and that is the number of browser and server events received.
Notifications
Open your Meta Event Manager by going to business.facebook.com. From there, log in to your account that includes your Meta Ads account and your Meta Pixel. Then use the menu in the left vertical bar to navigate to your Event Manager.
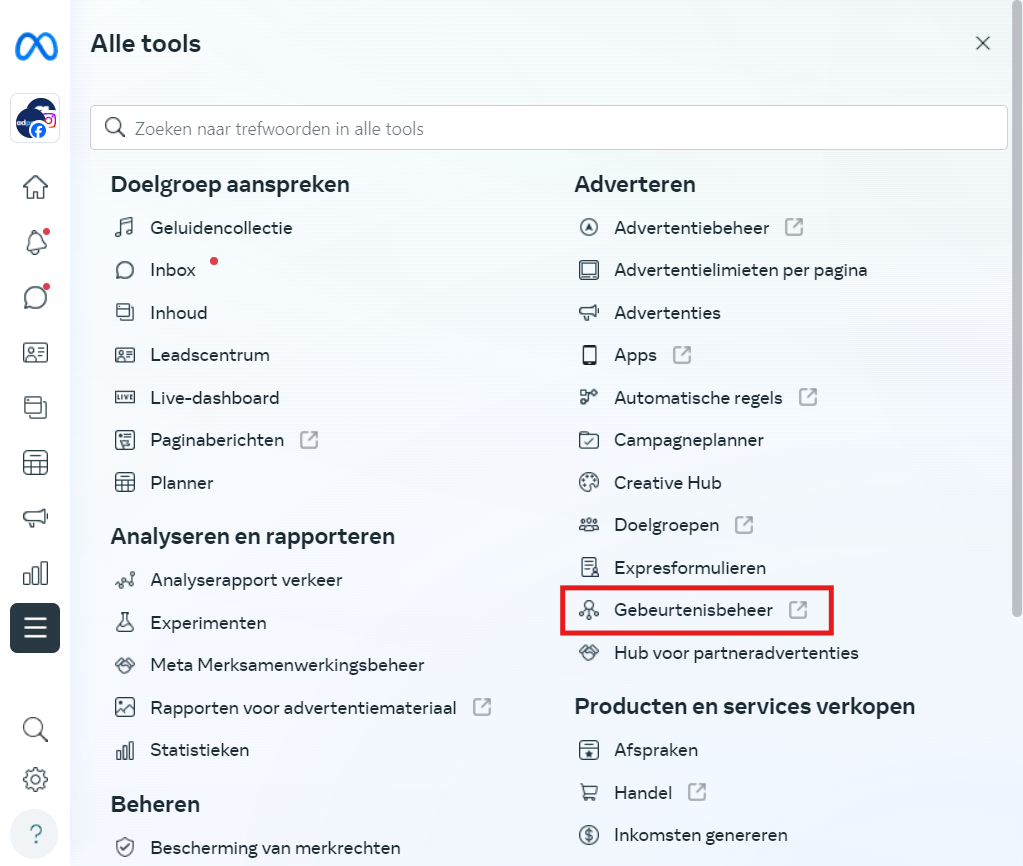
In the Event Management Overview, you will probably see one or more alerts:

The warning "Custom events cannot be used in conjunction with ad elements" is one you need to resolve. With this warning, Meta indicates that they have received events that they don't recognize, and it's up to you to confirm them (if you trust them because they come in through your first-party tracking method) or reject them (if they don't come in from your first-party tracking method).
Browser and Server events
Right click on your pixel in your Meta Event Manager to open it. This is because there we can view and compare the events received. Make sure you choose the pixel for which Server-Side Tagging is set up.

You will then see an overview of all events received in the past 28 days, how many of them were received and what quality score those events received. This overview can be found below the graph.

Flip open the PageView event by clicking on it, and then click "View Details.
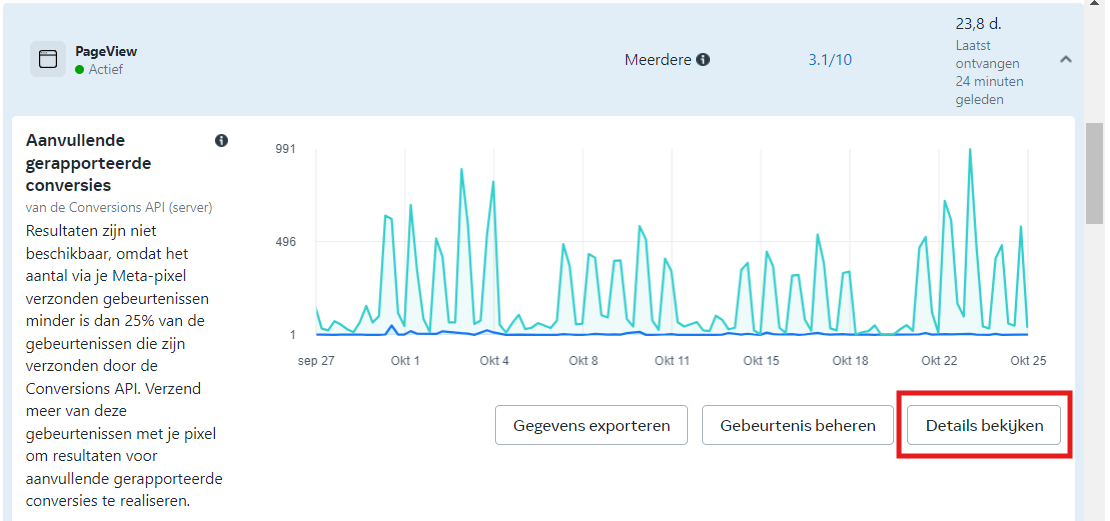
In the graph you will see the number of browser and server events received. And in the legend below the graph, you can see exactly how many browser and server events you received. If you have Meta Ads tags set up through both the GTM web container and the GTM server container, these two numbers will be close together. If you only have Meta Ads tags set up on the GTM server container, then you will (almost) only have received server events.
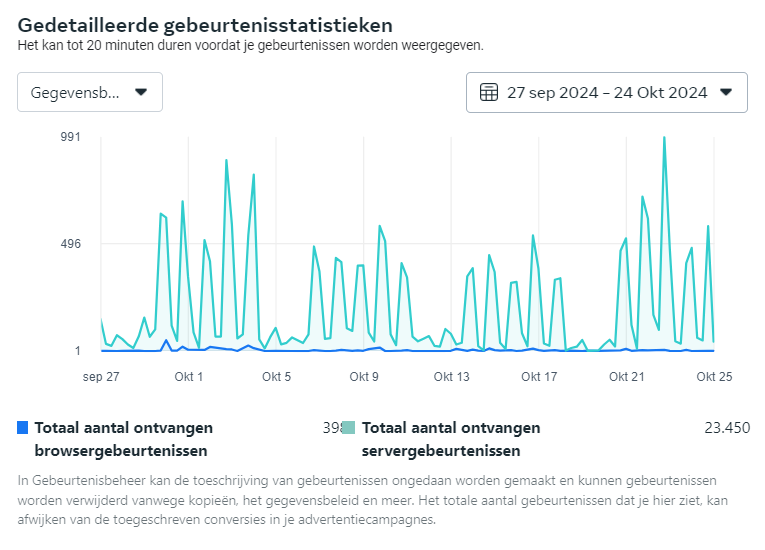
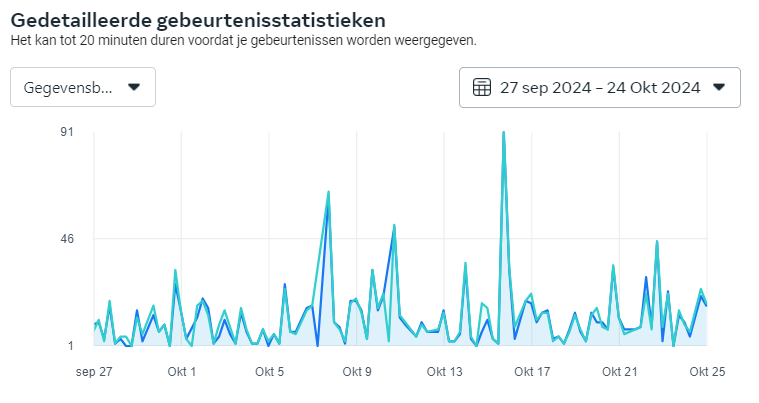
If you see here that the number of browser events (the blue line) is much higher than the server events (the green line) then you probably still have a third-party tracking method for Meta Ads present on your site. For that, perform the following steps:
- Check if any events are still set in the Meta Event tool configuration. If so, those events may be removed.
- Set up a list of allowed entities to ensure that you only receive events from your own domain.
- Check for a third-party connection from your site's backend. In Shopify that is the'Facebook & Instagram' app, in Wordpress it is often the 'Facebook for WooCommerce' plugin. But it can also be a manually placed script.
Now you've checked these steps for the PageView event. But especially do this also for the events you want to use as conversions in your campaigns or as events in your audiences for retargeting opportunities. Keep in mind that through webhooks you will always only receive server events (unless you are working with webhook deduplication ).
Quality scores
While checking the browser and server events, you will probably also have noticed that almost all of your events are given a strata quality score. These scores Meta determines automatically based on how well populated the parameters attached to an event are. If you click on that quality score, you'll probably see that Meta finds that you almost never include the zip code, country, first name, etc in your events.
.png)
.png)
The only events from which all those parameters are filled are the events of visitors who have filled out a contact form, for example, or who have made a purchase. So visitors who have given those specific contact details on your site. You can increase this automatically generated score of Meta by either never sending in those parameters again, but then sending in less data from returning/converting visitors. Or by directly asking your visitors for all this data on their first visit to your site, only then the number of visitors that will immediately leave your site will be enormous.
In any case, those scores do not affect your campaigns. They are automatic alerts and scores created by Meta to notify you that there are improvement opportunities. But in doing so, Meta itself does not analyze whether those improvement opportunities are actually possible/wise.
Google Ads
Google Ads is one of the most popular online marketing platforms because of its versatility. Through Google Ads, you can advertise through search results in the Google search engine, you can advertise before and during YouTube videos, you can advertise through display campaigns through banners on other people's websites and you can advertise through Google's Shopping platform, among other things.
Google has a lot of data about you and your visitors, because almost everyone on the Internet uses one or more Google products. But you as an advertiser are not allowed to use that huge pile of data from Google for your own ads, you will have to send first-party data to Google yourself that they may use for your campaigns and to identify your target audience.
This data is sent to Google Ads in the form of an event, which has many parameters attached to it. Your Google Tag Manager server container has tags set up that, based on one specific event coming into the server container, redirect it to one specific conversion action. Attached to this event are parameters that allow Google to retrace whether that event came from a visitor or a session that landed on your site through a Google Ads campaign. These include the glcid, wbraid and gbraid parameters.
What do you check in Google Ads?
There are two components you may check within Google Ads after your Server-Side Tagging implementation goes live. Those are the potential alerts that Google Ads may show and that is the difference between primary and secondary conversions.
Log into your Google Ads account and go to your conversions. You do that by going to "Goals" in the menu on the left and opening your conversion overview there.
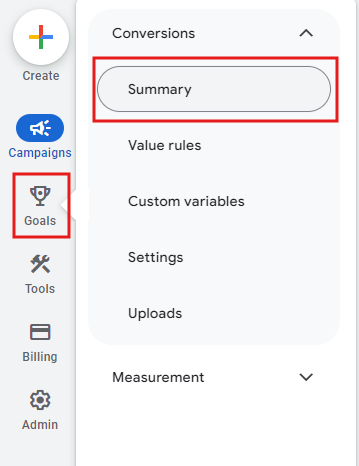
Under 'Status' you can then see for all your conversions whether any alerts have been given by Google. There are 4 different alerts you can see.
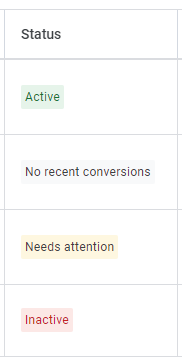
- Active
When Google Ads has received events for that conversion action and can attribute those events to the campaigns, you have an active conversion action.
- Inactive
If Google Ads has never received an event for that conversion action, that conversion action is inactive.
- No Recent Conversions
When Google Ads has already received events on that conversion action but none of those events can be attributed to the campaigns you get the warning that no recent conversions have been detected.
- Needs Attention
When Google Ads has already received events that can be attributed to campaigns, but if there is still something lacking in the events, you get a warning that you may pay attention to that conversion action. Often this is about consent mode not being set properly, enhanced conversions not being turned on, enhanced conversions being turned on but no user-provided data being sent along, or the enhanced conversions not being formatted properly.
Primary conversions vs Secondary conversions
Primary conversions are the conversion actions used to drive Google Ads' automatic bidding strategy, as long as the target associated with them is set to bid. Secondary conversions are there for viewing only. They are reported but are not used for bidding. Not even if the goal they belong to does.
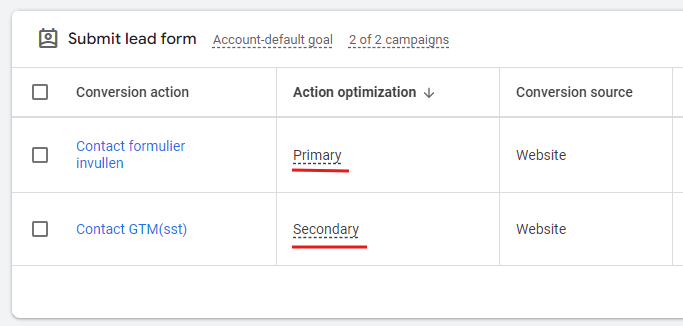
After your Server-Side Tagging implementation, there will be new conversion actions attached that are fed by the tags on your Google Tag Manager server container. These conversion actions will default to secondary so as not to disrupt bid strategies of your current campaigns. This responsibility lies with you to determine which conversion action your bid strategy will work based on.
So after the Server-Side Tagging implementation, it is up to you to determine which conversion action has more accurate or better measurements to determine which one you put on primary. Either the Server-Side conversion, the Client-Side conversion or the GA4 import conversion can have better measurements from your perspective. The Server-Side Tagging conversion action may not necessarily be the best performing conversion action, as that depends on Google's modeling and how Google can apply the different conversion attribution.
Other marketing platforms
What do you check in TikTok Ads?
Open your TikTok Ads Manager and under "Tools," go to "Events," and open your Pixel where you receive Server-Side events.
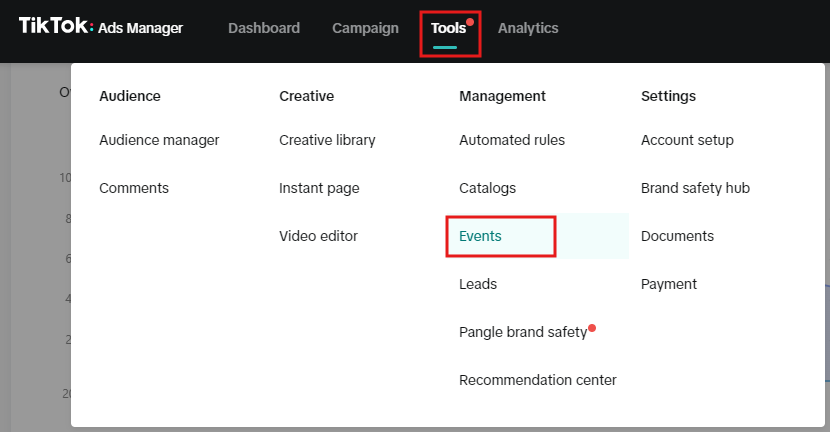
Here you can view the Event Health for your Complete Payment (purchase) event. For all other events, you can view how many times the event was received and from which domain it happened.
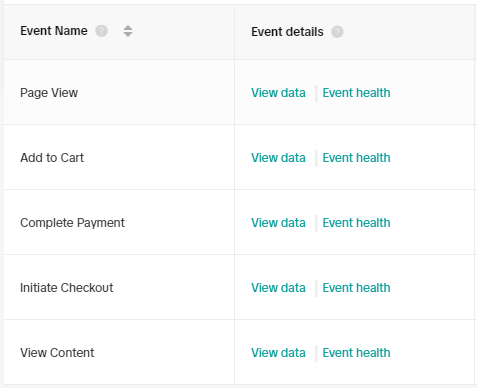
Ensure that there are no inactive events and that the number of events received relatively matches the number of events received within GA4 for the same period.
What do you check in LinkedIn Ads?
Open your Ads Manager and go to "Track Conversions.
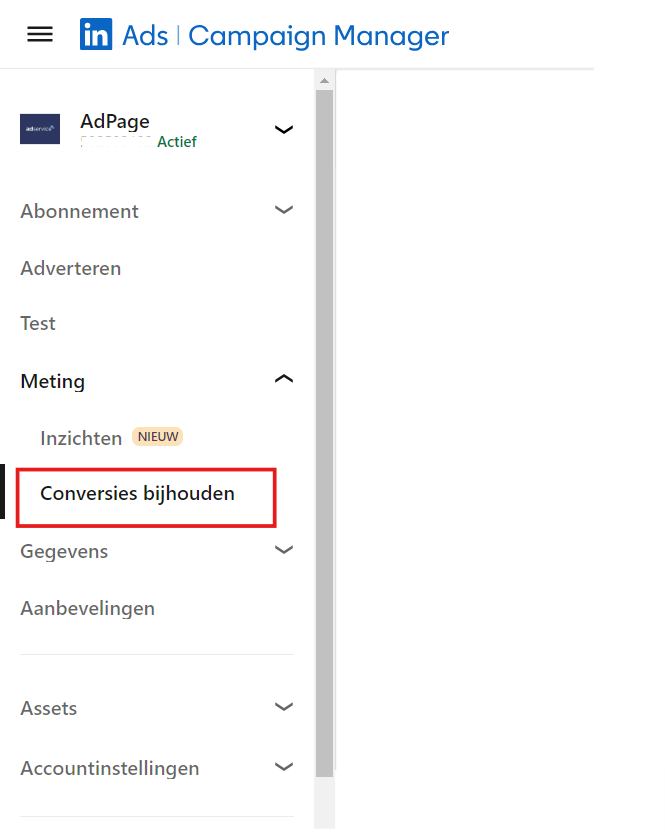
Your conversions here can have 3 different statuses. Inactive, Active or Not Verified. Active indicates that events are received, Inactive indicates that events were once received but have not been received in the recent period, and Not Verified indicates that no event has ever been received on them, and thus LinkedIn cannot verify that the conversion measurement is set up correctly at all.
What do you check in Pinterest Ads?
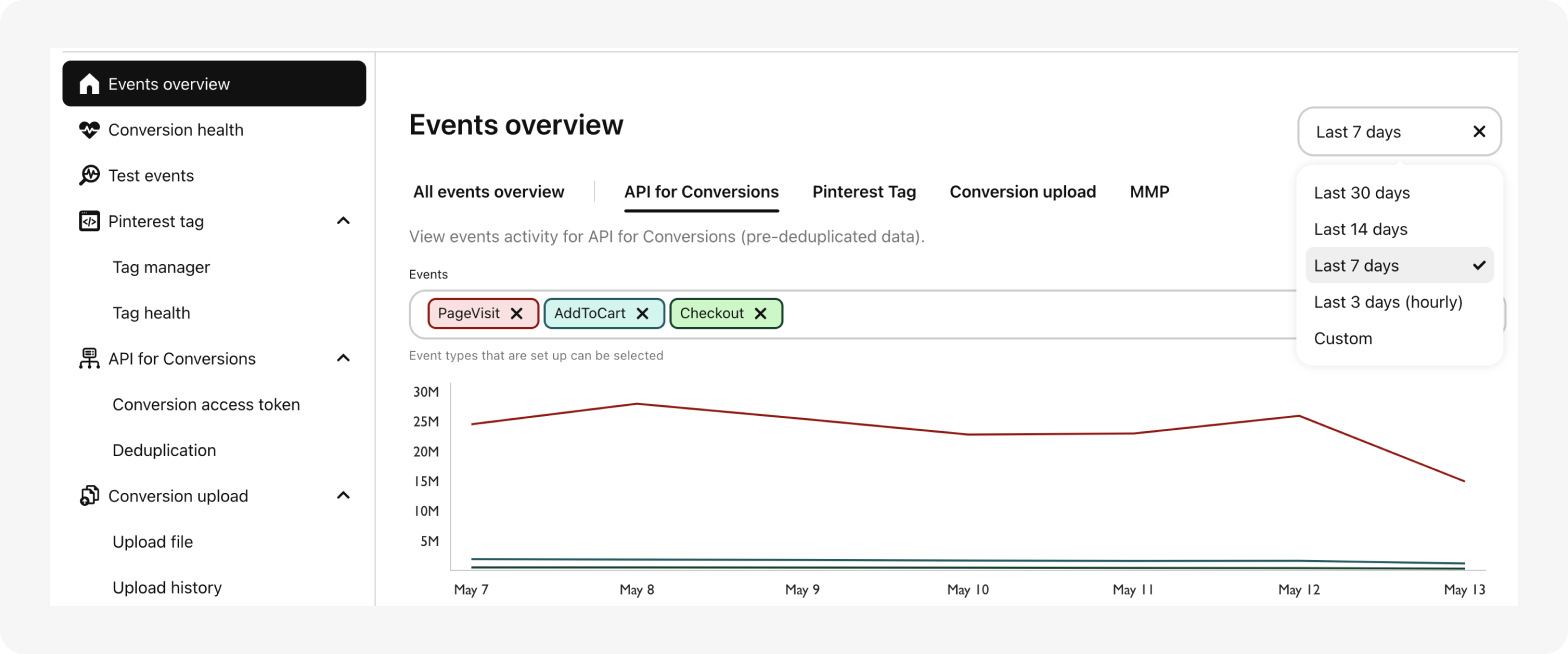
In your Pinterest Ads, open your Events view to see if any events were received on the Conversion API (via Server-Side) and if the numbers match what you can see in GA4.
Common problems by platform
After moving to Server-Side Tagging, you and your customer are hoping for better insight into their first-party data and more accurate measurements. But after implementation, unexpected problems can crop up that still complicate data analysis. Think unexplained differences in conversion numbers between platforms, a high percentage of "unassigned" events in GA4, and error rates that make measuring actual conversions more difficult. We will explain the most common challenges after a Server-Side Tagging implementation and offer practical solutions to improve data quality and get more out of measurements.
My ad channels claim different conversion numbers from Google Analytics
GA4 may assign conversions to different sources than Meta Ads or Google Ads, for example, because of differences in attribution models, tracking methods and attribution windows. Each platform uses its own rules for tracking and attributing conversions, such as using first-click, last-click or data-driven models. In addition, the length of the attribution window (the time in which a conversion is recorded) varies by platform, leading to discrepancies. User recognition can also vary due to privacy settings and cookies, so each platform may indicate a different source for the same conversion.
If a visitor comes to your site on Monday from a Meta Ads campaign, on Tuesday Googles the name of your site and clicks on your Google Ads search campaign, and on Wednesday lands directly on your site and proceeds to convert, both Meta Ads and Google Ads will claim the conversion for their own campaigns while GA4 shows that the conversion was from a direct visitor.
.png)
Percentage of 'unassigned' in GA4 is too high
Google Analytics 4 (GA4) is a valuable tool for tracking and analyzing user behavior on websites. Every click, page view and conversion is a piece of the puzzle that helps make better decisions and adjust your strategy. Yet there is one tricky problem that can confuse even experienced GA4 experts: "unassigned" in your GA4 reports.
Google Analytics 4 divides traffic sources into larger categories so that you, the user, can get an overall picture of which types of channels are performing best. For example, visitors from organic searches via Bing and Google are placed together under the default channel group "Organic Search. If Google does not know which source a session or visitor should be assigned to, then that session or user remains 'unassigned' and is not given a specific channel group.
Is your Unassigned non-assignable at all?
First, you will need to check the Unassigned traffic is actually unassignable. To do this you open the GA4 traffic acquisition report. There you add the additional dimension 'Session source/medium' via the blue plus and enter unassigned in the search bar.
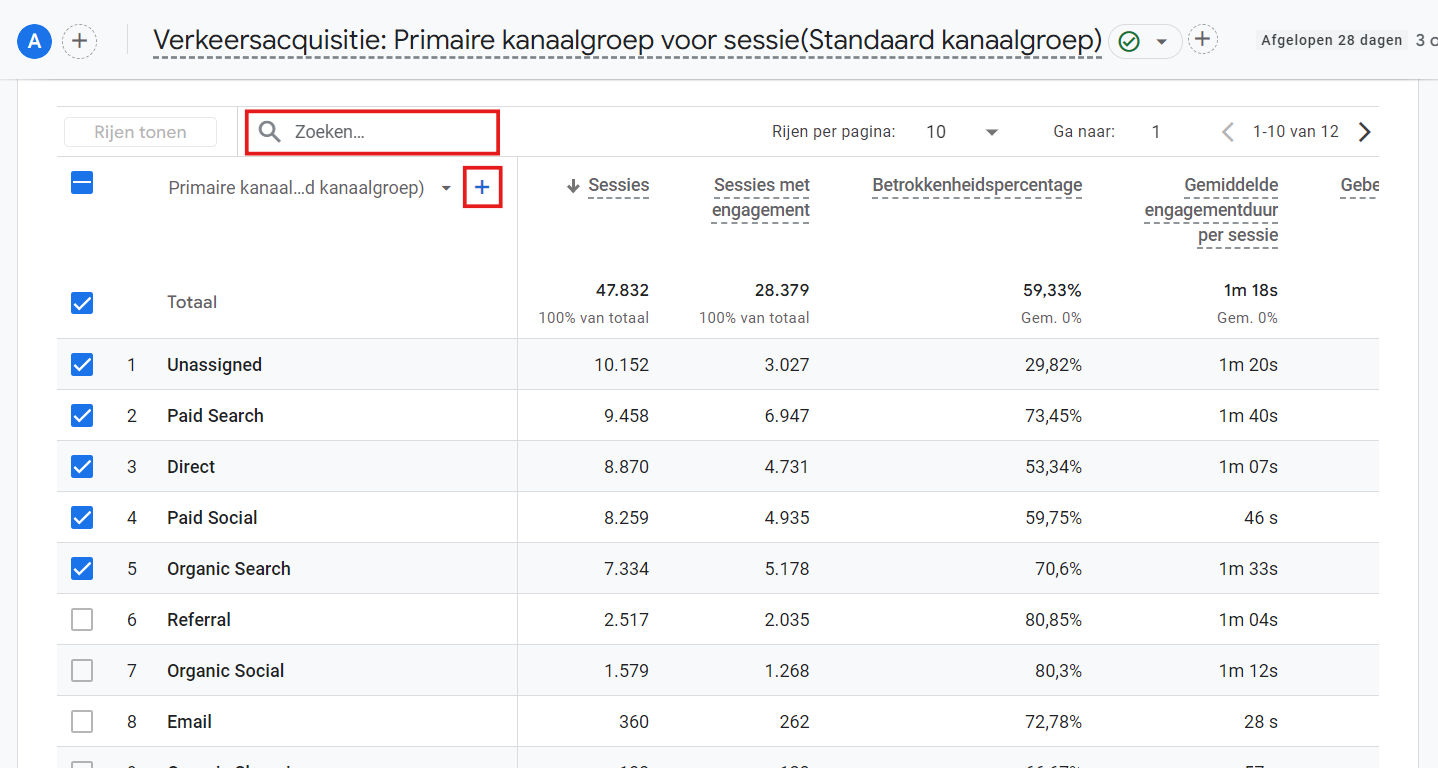
You can now see whether visitors may have come to the site from sources and mediums that are not recognized, or whether all the unassigned traffic is really '(not set)'. Keep in mind that GA4 uses a data processing period of 24 to 48, so if you look at yesterday's day, the percentage of unassigned is always high.
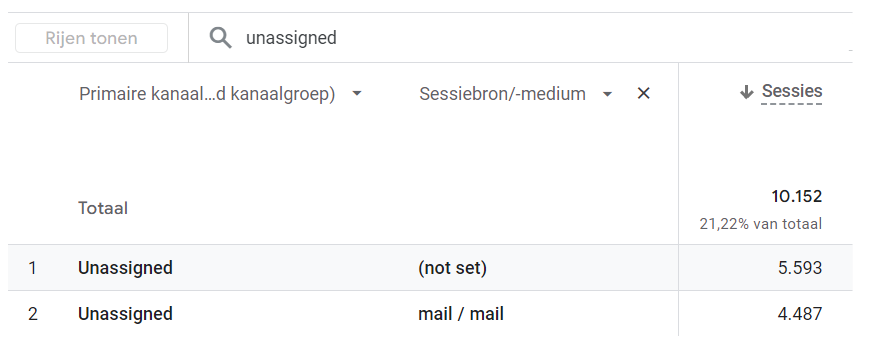
If you see as in the screenshot above that you have a lot of traffic from a source/media that is not recognized, then you are not using the right UTM parameters somewhere. So in the case of the screenshot above, this is a mail campaign with the wrong UTM parameters.
How is the Cookie banner set up?
One of the most important factors that may play a role in the high Unassigned rate is the cookie banner configuration and associated consent processing via Google Tag Manager. When a user visits a website, it is crucial that they give their consent for data to be collected. If this is not set up properly, or the processing of that consent, it can lead to incorrect or incomplete traffic in GA4.
This blog article on setting up your triggers on Google Tag Manager in conjunction with consent processing explains in detail how to set up the cookie banner through GTM in conjunction with Server-Side Tagging. By following these guidelines, you can ensure optimal data collection and minimize unassigned traffic.
Do the client_id and session_id remain the same during a site visit?
GA4 recognizes a user and that user's sessions based on parameters such as the client_id (user id) and the session_id. Thus, if either of these two IDs change mid-session, GA4 detects a new user a new session of an existing user whose origin cannot be recognized.
To explore this, open the "Explorations" within your GA4 property.
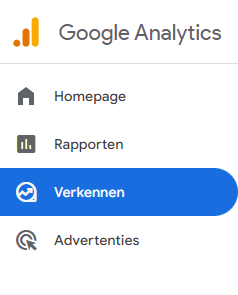
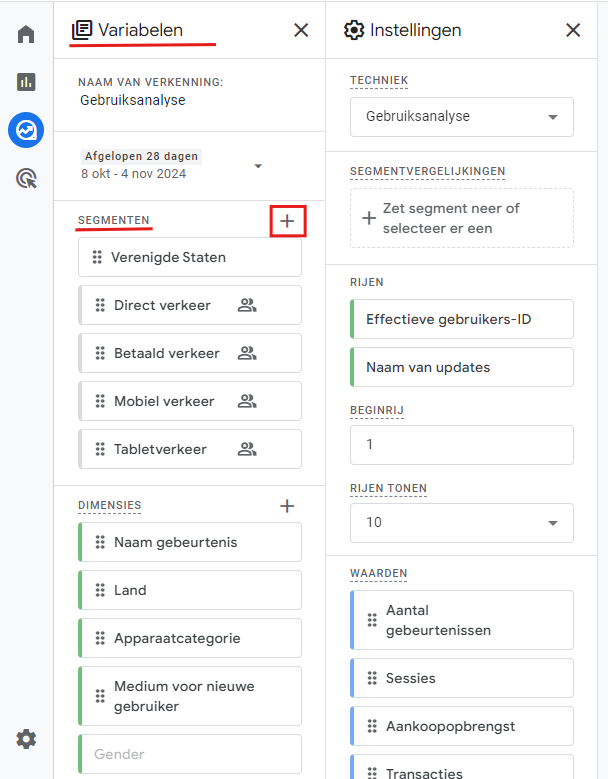
Here you select the 'Usage analysis'. After opening the usage analysis, click on the plus sign of 'Segments' in the left column under 'Variables'.
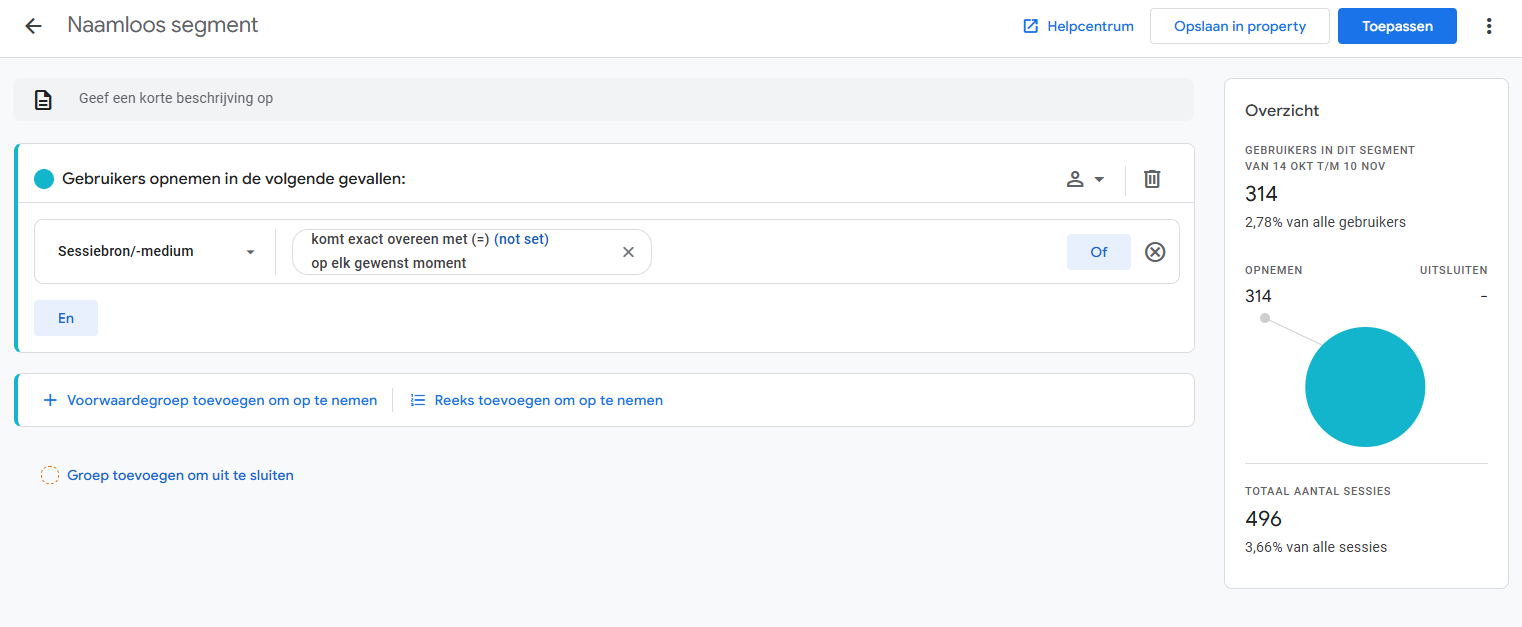
Create a new segment. Select 'User segment'. As a condition, enter 'Session source/medium' corresponds exactly to (=) '(not set)'. Then click apply.
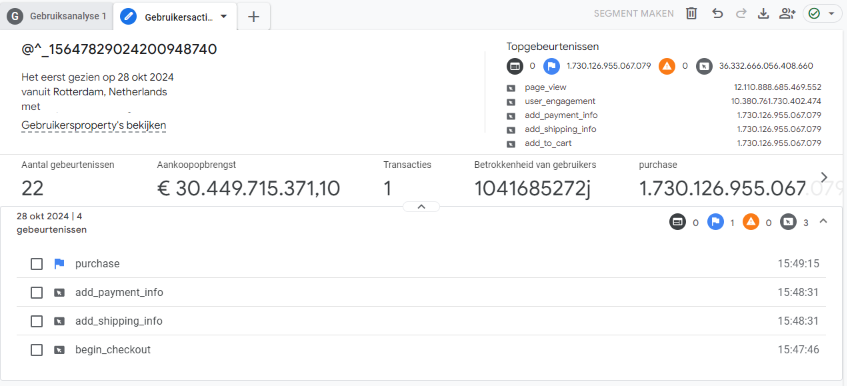
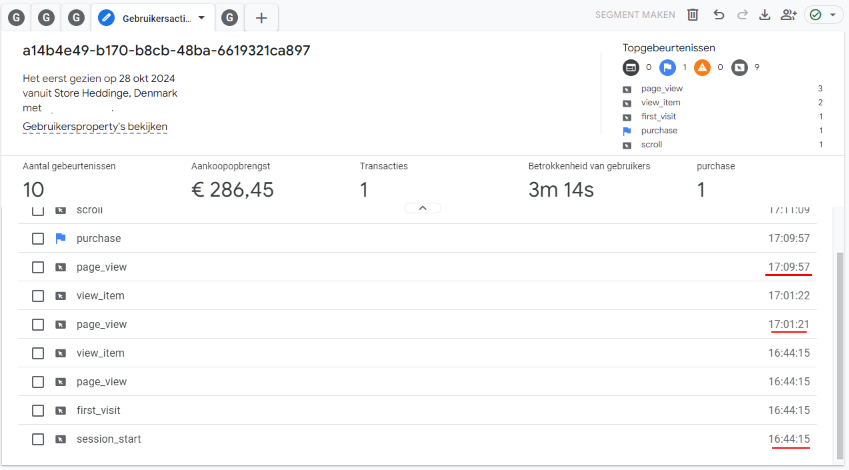
In your user analytics, you can now see all the sessions of the unassigned visitors. By examining a specific session, click on the Effective User ID of one of those visitors. You can then see all events collected from that user/session and at what time they were collected. Based on this, you can analyze whether something is going wrong in matching events to users.
How real is it that the first discovered event of a session is the 'begin_checkout' event?
How real is it for a visitor to visit one page every 15 minutes and then suddenly make a purchase without an add_to_cart or begin_checkout event?
More possible solutions for Unassigned traffic
The unassigned problem in GA4 is a significant problem that affects every marketer and entrepreneur. This is because it cannot be solved overnight. Above, we have elaborated the three main problems and solutions caused by a Server-Side Tagging implementation. Should those three solutions not have provided the desired results, you could also check out our blog article with even more solutions to the Unassigned problem.
Server-Side Google Ads conversion claims no or too few conversions
Different types of conversions, for example via server-side tag, GA4 import or on-site scripts, use different methods for collecting data. This can lead to measurement differences. It is important to check which conversion is most accurate and see if certain conversions may be measuring too much. For example, consider the difference between a conversion based on a thank you page view (possibly overestimating) compared to specific interactions based on the DataLayer (possibly more accurate).
While a server-side conversion has advantages, it does not mean that it is always the best. GA4 import conversions, for example, can often be more reliable because they also use UTM parameters that help identify campaigns, among other things. This provides insight into which users landed on the site through a specific campaign, which is especially valuable when optimizing marketing campaigns. The data you collect in GA4 also comes from your Server-Side Tagging setup but can be processed and modulated differently by Google Ads.
Besides the fact that there can always be differences between different conversions and their performance, there are also a number of other problems or settings you can check to find out if something is really going wrong.
Problems with Gbraid and Wbraid parameters for Apple visitors
For Apple visitors, there may be problems with the Gbraid and Wbraid parameters, which are not properly passed along via the standard Google Ads tag in the server container. AdPage has therefore also developed a custom server-side tag that works based on webhooks and can pass these parameters along. For instructions on how to implement this tag, see this guide from AdPage. So can you figure out in GA4 that you have a lot of site visitors on Apple devices, chances are your server-side conversion could perform worse.
Check the attribution model
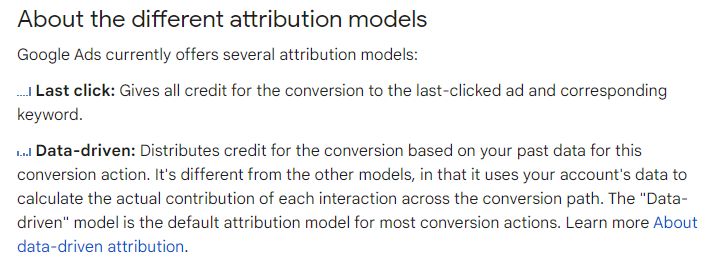
Attribution models determine how Google Ads attributes to different channels in the conversion path. There are several options:
- Last Click: This attributes the conversion to the last interaction point before the user converted.
- Data-driven: This model uses machine learning to determine which touchpoints contributed the most to conversion based on historical data.
The data-driven attribution model differs from other attribution models in that it uses your own conversion data to calculate the actual contribution of each ad interaction in the conversion path. This model is specific to each ad account. Data-driven attribution analyzes all interactions on your Google Ads campaigns in Search, YouTube, Display and Demand Gen. By comparing the paths of customers who do and do not convert, the model identifies patterns of interactions that are likely to lead to a conversion. These valuable interactions are then given more "credit" in the model. This allows you to see which ads contribute the most to your business goals.
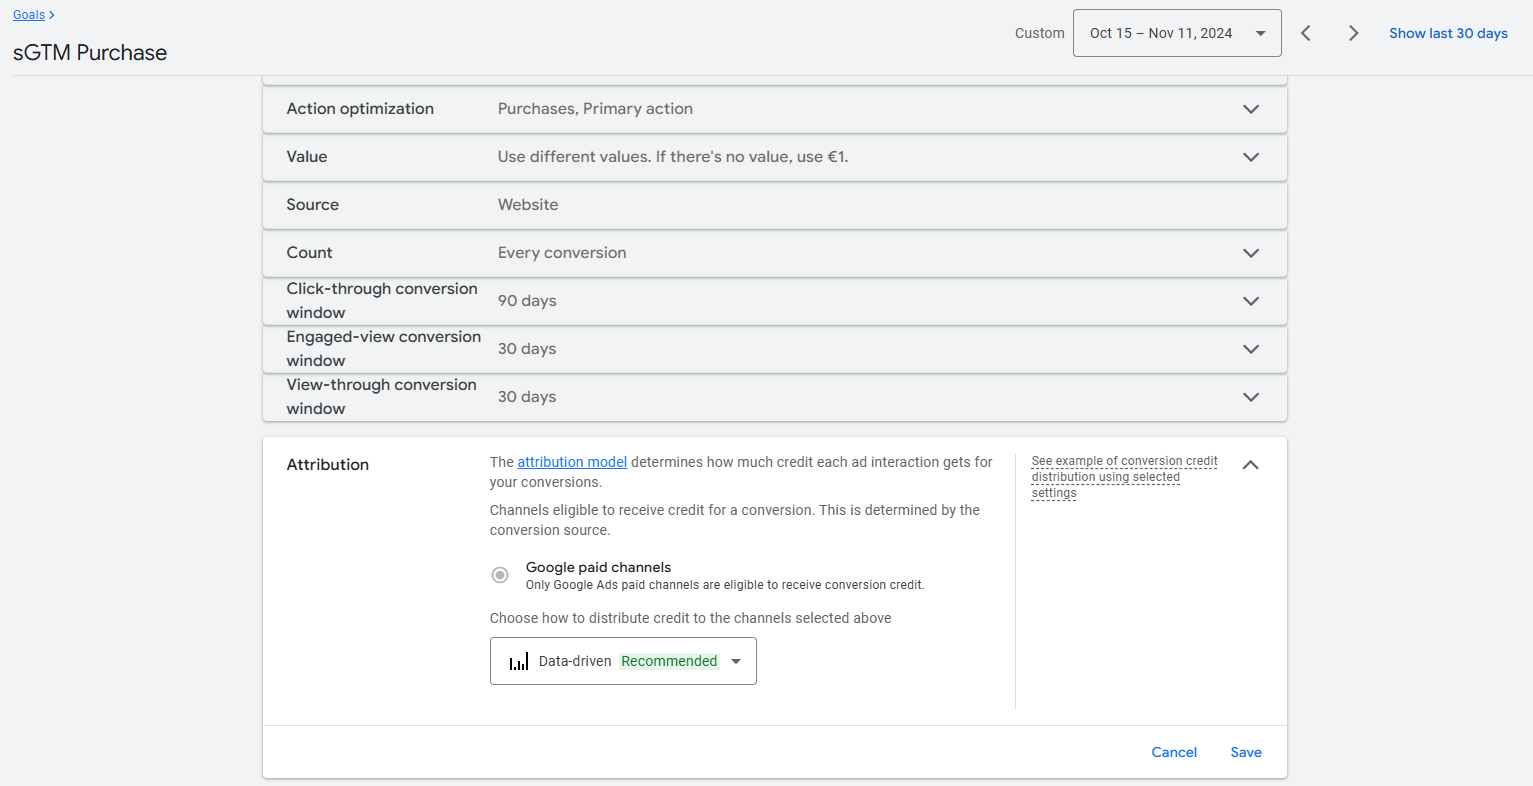
To check which attribution model your ad account uses, go to "Goals" in your Google Ads account. Open one of your conversions by clicking on it and go to settings. Under 'attribution model' you can then determine whether you want to look at the last click only, or use the data-driven model.
Consent Modeling
Consent Modeling takes into account users who have not consented to tracking. Google fills in the missing data by using models for conversions that lack tracking information. This helps to estimate performance more accurately, but may cause some bias, including between different conversion targets within Google Ads itself. See the Google Consent Modeling documentation for more details.
Margin of error between measured conversions and actual conversions in GA4
After implementing server-side tagging, you may still see differences between measured conversions in GA4 or your marketing platforms and actual conversions. This difference, called the "margin of error," can often raise questions. There are several factors that can cause a discrepancy between measured and actual conversions. Some of the main causes are:
Adblockers and tracking prevention: Many users use AdBlockers or browsers with built-in tracking prevention that also block first-party tracking scripts and cookies. As a result, user actions of some users may still not be measured even when you use a first-party tracking setup.
Users' cookie preferences: Due to privacy regulations such as the GDPR, you must give visitors the option of giving permission to set cookies through a Consent Management Platform (CMP). This choice of giving or refusing cookie-consent also affects your first-party tracking. If users reject analytics or marketing cookies, that user's events will not be forwarded to the analytics or marketing platforms.
Network connectivity and technical issues: Technical issues, such as connectivity problems, script errors, or tagging configuration errors, can cause not all data to be transmitted correctly to your channels.
How do you minimize this margin of error?
While you will never achieve 100% accuracy, without the use of webhooks, there are some steps you can take to reduce the margin of error in your conversion measurements:
Optimize your CMP: Make sure your cookie banner is un-negative so visitors can't use your site without having explicitly given or declined consent. Also, give your visitors a clear choice to turn tracking on or off and offer a "yes"/"preferences" option to minimize the effect of cookie preferences on your data. If you already show an "decline all" button on the first screen of your cookie banner, you increase the percentage of visitors who decline cookies.
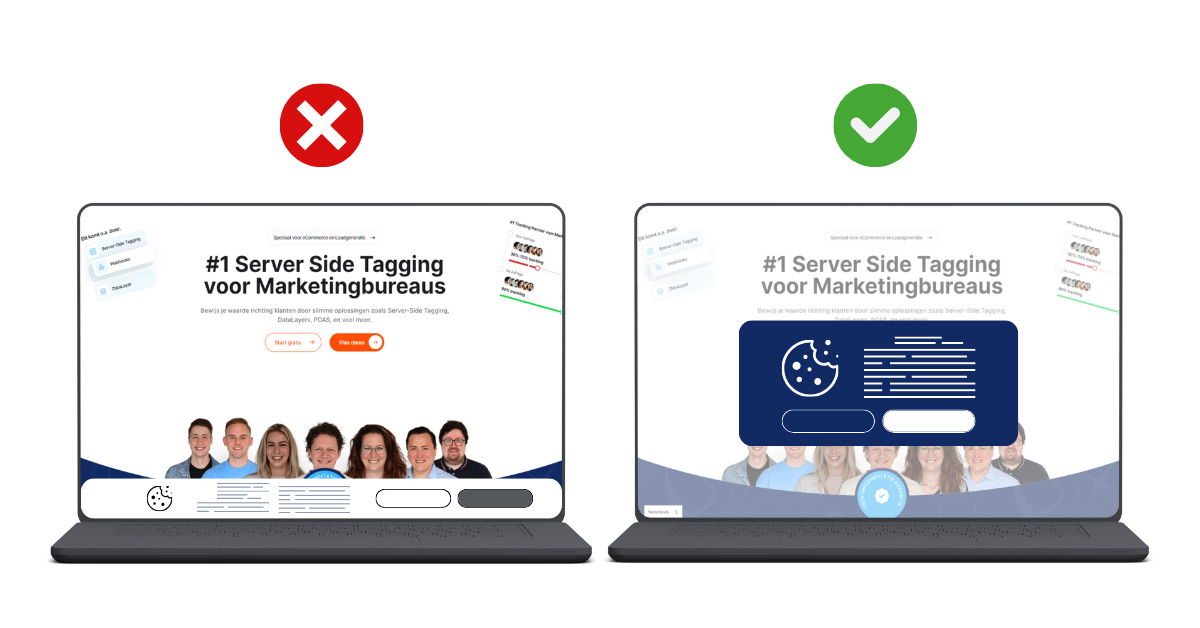
For more information on setting up your CMP and arranging it through Google Tag Manager, check out this blog article on setting up a CMP in conjunction with Server-Side Tagging.
Regular audits and monitoring: Keep a close eye on your analytics and marketing results so you can fix any problems quickly. By tracking error messages and any discrepancies in the data, you can maintain or improve the accuracy of the tracking setup. In fact, many different stakeholders at a website or online store have the ability to modify components in Google Tag Manager or on the site that can have negative effects on tracking.
On the trytagging environment, you can set up alerts to receive an automatic email when a status change is detected regarding the server or the tagging pixel.
How do you make the best use of first-party data?
First-party data is increasingly becoming the norm for digital marketing, especially as privacy regulations tighten and the effectiveness of third-party cookies decline. If you already have a Server-Side Tagging implementation set up, you've already realized the usefulness of first-party data. But after implementation, we find that there are often still questions about how this data can actually be used within different platforms.
In this section, we explain for popular analytics and marketing platforms how to make the most of your collected data. Whether it's reading valuable insights in Google Analytics, applying customer intelligence in Google Ads, or maximizing your targeting options in social media, we'll show you how the right data setup can strengthen your marketing efforts and drive better results.
If you yourself have little or no experience with certain marketing channels or with Google Analytics 4, then the following is ideal for you. If you do have experience with these, then you're probably not going to read much new.
GA4
Google Analytics allows you to gain comprehensive insights into your visitors' behavior, provided the data is collected correctly and completely. By using Server-Side Tagging, you get more out of your first-party data, as data is processed more accurately and securely and privacy restrictions have less impact on your measurements. In this section, we will discuss the most popular and important reports in Google Analytics and how to best interpret and leverage the data collected in those reports. For each important report, we will explain what you can glean from it, what you can conclude and what, if anything, you can do with those conclusions.
Traffic Acquisition & User Acquisition
The traffic and user acquisition reports in GA4 provide insight into the channels that drive visitors to your Web site. With this data, you can evaluate which channels generate the most traffic and which channels contribute to acquiring new users. This gives you a good picture of your overall marketing performance and helps identify the strongest and weakest channels.
The user acquisition report shows only your new users. These are users who have never been detected by GA4 before. The traffic acquisition report shows all your users, both new and returning. By default, these visitors are divided into different channel groups. Channel groups are categories into which traffic to your site is automatically categorized based on their source. GA4 classifies traffic through standard channel groups such as "Organic Search," "Direct," "Paid Search," "Social" and more.
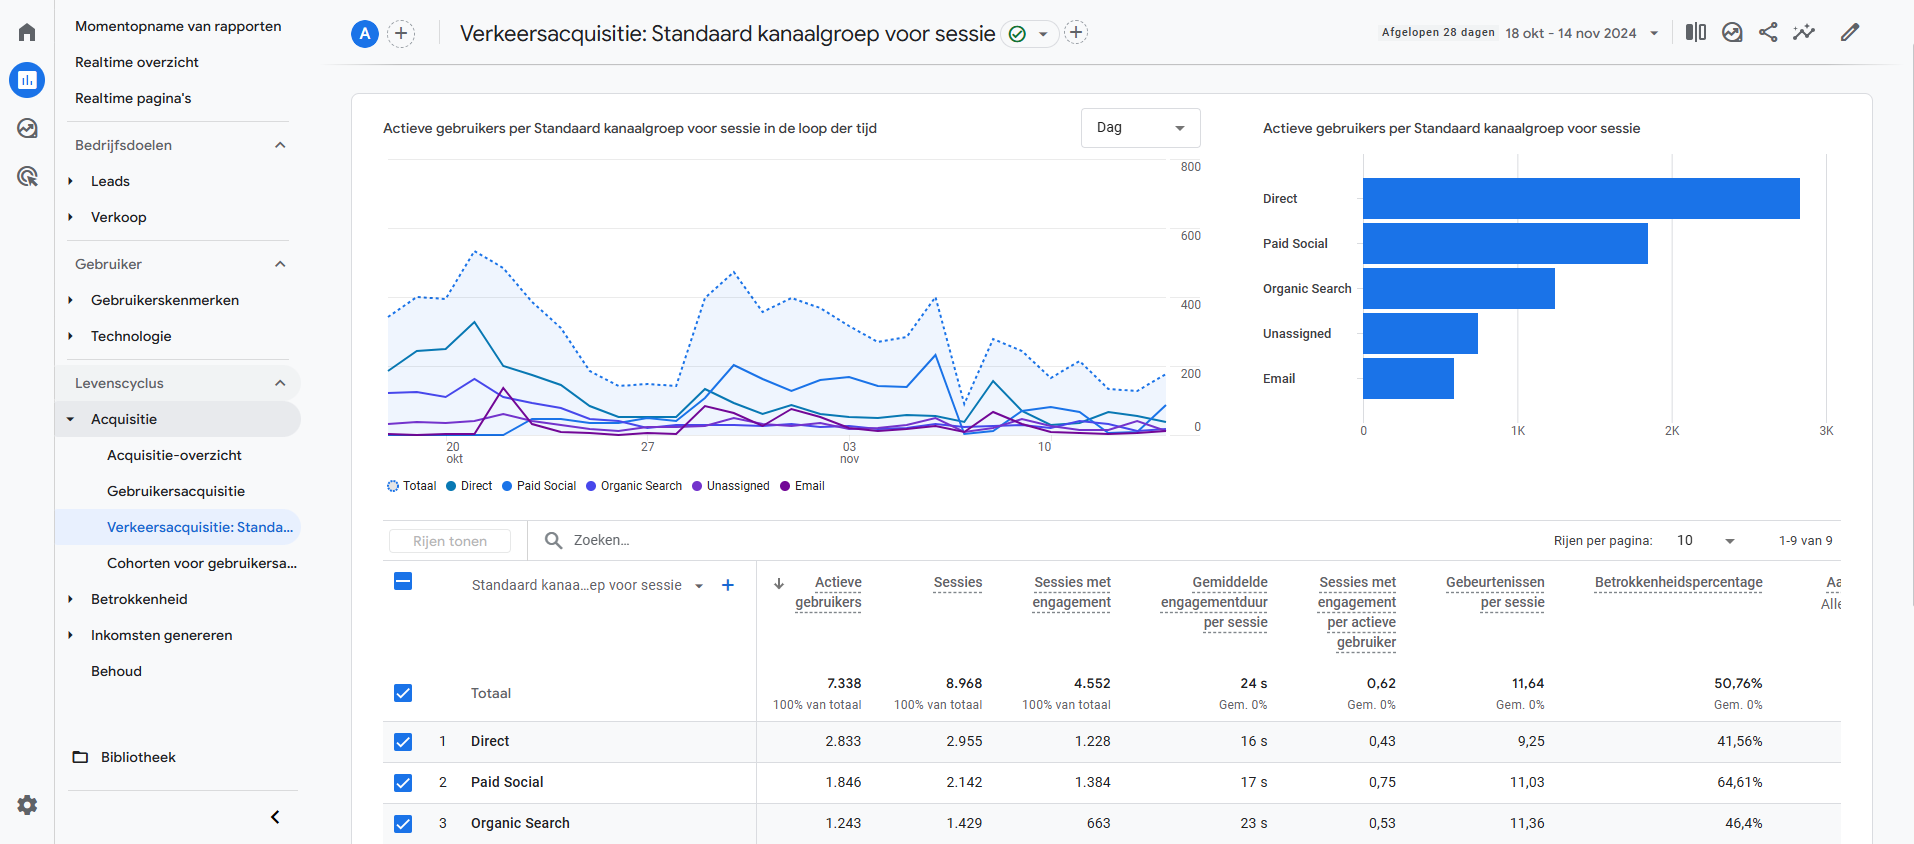
To populate these reports as accurately as possible, it is essential to add UTM parameters to the links in your campaigns. UTM parameters provide additional information about the source, medium and campaign of your traffic which is essential for GA4 to categorize traffic. Without UTM parameters, traffic can be recorded as "Direct," leading to inaccurate insights and missed opportunities to evaluate the performance of specific campaigns.
What can you glean from these reports?
- Key traffic sources: Find out which channels generate the most traffic and which provide the most new users. This helps determine where your marketing budget and efforts are paying off the most.
- Quality of users by channel: Compare not only the number of visitors, but also the behavior by channel, such as average session duration, bounce rate and conversion rate. This can tell you whether users of a particular channel actually engage or convert.
- New versus returning users: See if a channel brings in mostly new users or more often brings in returning traffic. This is useful to see which channels contribute to both your reach and audience loyalty.
Possible next steps based on conclusions
- Optimize underperforming channels: If a particular channel is generating a lot of traffic but those users are showing low engagement, you may want to review your strategy for that channel. Possible actions include improving the targeting, content or frequency of your ads. Often there is a difference in the expectation that a visitor clicking on a campaign has and what they find on the landing page.
- Adjust budget allocation: If a specific channel performs well, you can consider allocating more budget to it to get even more return from this channel. And vice versa, of course, this also works; if a channel is not performing well, you can decide to scale back or stop doing so.
- Develop channel-specific campaigns: For channels that are performing well, you can develop customized campaigns to attract new users or encourage returning visitors to convert (again).
Pages and Screens & Landing Pages
The 'Pages and Screens' report shows which pages/screens were visited on your website or app, including key metrics such as session duration and bounce rate. The 'Landing Pages' report provides insight into the first pages users see when entering your site and how well these pages perform in engaging and retaining visitors.
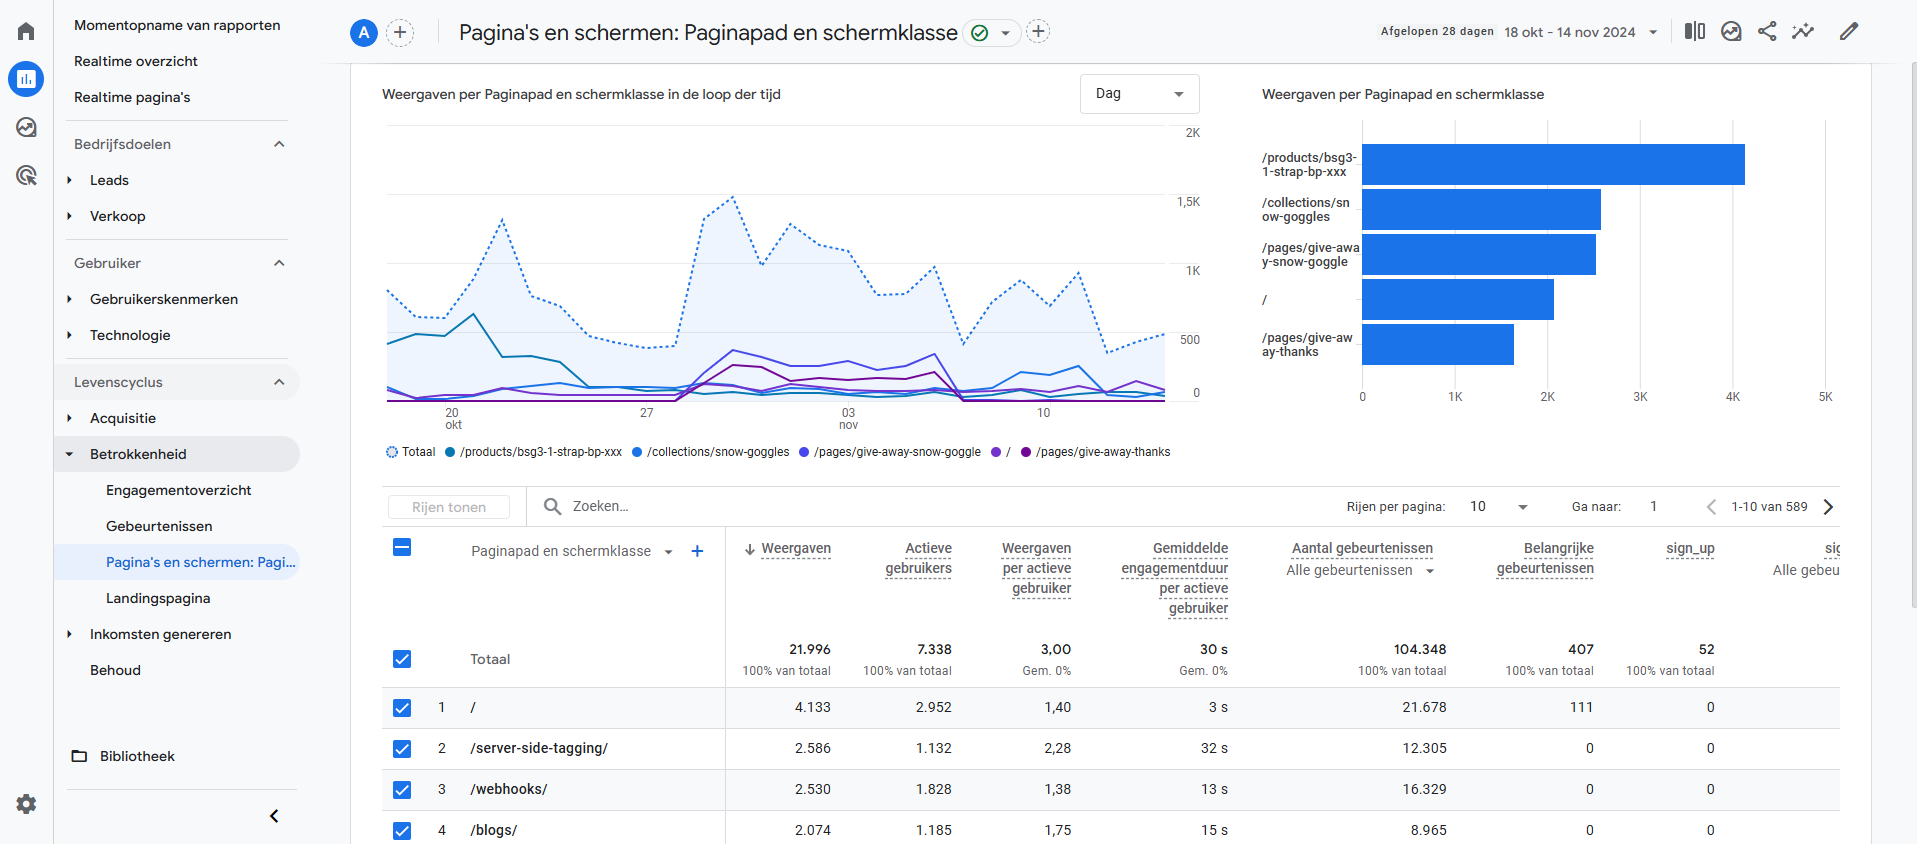
What can you glean from these reports?
- Top performance by page or screen: See which pages generate the most traffic and engagement, and where users stay longer or drop out quickly.
- Effectiveness of landing pages: Analyze which landing pages are the most popular and which drive conversions, or, on the contrary, cause a quick bounce. Which page is the first point of contact for your visitors? What is their first impression of your site and your brand?
Possible next steps
- Landing page optimization: Improve pages with a high bounce rate by adding more relevant content and better call-to-actions. Also check especially the load time of your most popular pages and whether this can be improved.
- Expand popular content: Deepen successful pages with more content or enhance these pages so they can also act as landing pages for campaigns.
- Refine conversion paths: Identify where visitors often drop out in the conversion process and improve these parts, such as by simplifying the UX.
Technology: Overview
The "Technology: Overview" report in GA4 provides insight into the technical characteristics of users visiting your website, such as the device, operating system and browser they use. With this data, you can analyze which technologies are used the most by your target audience. This is valuable information for optimization of your website and user experience.

What can you glean from this report?
- Device performance: You can see which device types are used the most (desktop, mobile, tablet). This provides insight into how visitors experience your site on different devices.
- Browsers and operating systems: By looking at the most popular browsers and operating systems, you can assess whether your site or app works well on all major platforms, or if there may be compatibility issues. This is mainly also important to know because some operating systems and browsers use Tracking Prevention methods.
- Screen resolutions: Understanding the most common screen resolutions helps ensure that your site displays well on different screen sizes. Inside most browsers, you have the ability to view the different sizes of mobile devices on a desktop as well. So you can check for all your most common screen resolutions to see how they see and use your site.
Possible next steps based on conclusions
- A/B testing on specific devices: Run A/B tests on the devices or browsers where performance is lagging to see what modifications improve the user experience. For example, you can test different layouts by device type.
- Adapt content and UX for mobile: If mobile traffic is increasing but performance is lagging, you can improve content and UX for mobile, such as larger buttons, easier navigation or faster load times. Indeed, have you not yet optimized your site for mobile users, but see that more than half of your visitors are visiting your site on a mobile device? Then you know what is the most urgent priority in terms of site optimization.
- Monitor and optimize load times: With visitors on slow networks, it can help to optimize page and media content (such as images) to reduce load times, improving the mobile experience.
E-commerce purchases
The "ECommerce Purchases" report is specifically designed for eCommerce web shops that can track the entire customer journey through an eCommerce DataLayer. This report provides insight into customer purchase behavior from viewing specific products to final purchase. For companies that process purchases through external systems or sales funnels (outside of their own website), this report will be less relevant, as the tracking then (in most cases) cannot capture the full customer journey.

Keep in mind that there is a difference in the values in this report and the values you can see in other reports. Other reports look at the value of the purchase event, which is the total value of a purchase in a session including all products purchased together, VAT and shipping costs. This is captured when the purchase event is triggered and shows the value of the entire transaction. The product value in the E-commerce purchases report shows the value of each individual product within a purchase. This level of detail helps to see what share each product has in total sales and how individual products are performing.
What can you glean from this report?
- Product Performance: See which products sell best, average value per sale and number of units sold per product.
- Purchase behavior and funnel analysis: View the course of the customer journey, from product views and adding to cart to final purchase. This provides insight into where users may drop out in the purchase process.
What can you conclude?
- Identify top products: By analyzing products that are frequently purchased or generate high sales, you can identify popular and profitable items.
- Funnel optimization: If there are many users adding products to the cart but not proceeding to purchase, this may indicate possible areas for improvement in the check-out process. Similarly, if products are viewed a lot, but hardly anyone proceeds to add to the cart, you will need to find out what is holding visitors back.
- Focus on specific products: Run campaigns specifically for high-performing products in terms of conversion rate, or for poor-performing products to increase that conversion rate. Or add cross-selling or upselling, such as by showing related products or discounts at checkout, to put more focus on lower-performing products.
Meta Ads
Now that you are in control of which events are created for which site interaction, you can also control which events are sent to Meta Ads. So you have complete freedom to run campaigns and retargeting campaigns based on very specific site interactions.
In doing so, we recommend running your campaigns on the standard events according to the GA4 protocol whenever possible. This is because the algorithm understands what a Lead event is and how high the threshold is for a visitor to leave contact information. Whereas for a custom event like 'newsletter_subscription', the algorithm does not know what this means. The algorithm cannot decipher that this is a newsletter signup, even though it is literally in the event name. Retargeting campaigns, on the other hand, can be run on custom events, but more on that below.
Targeting options
Now that you get less and less choice from Meta about which audience to target, you are even more dependent on the data you collect yourself so that you can drive the Meta algorithm based on that data. Based on self-collected data, you can still create target groups to run (re)targeting campaigns on. There are also other targeting options you can use and feed with your own collected data.
Retargeting target
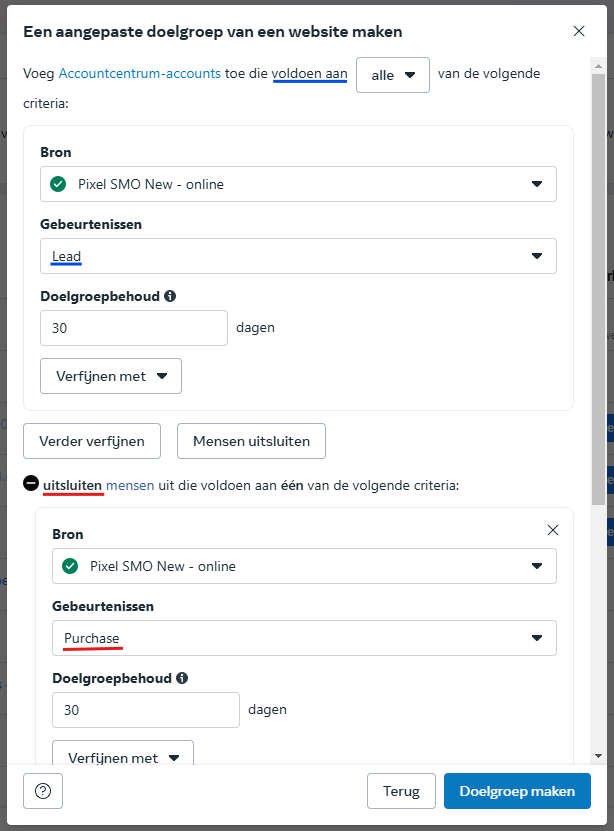
Retargeting is showing ads to people who have already interacted once with your campaigns or with your site. In the case of Meta Ads, you can create a target audience based on events visitors have had on your site. For example, do you want to use a retargeting campaign for site visitors who did not proceed to purchase but started the checkout process? Then you can create a target audience based on visitors who had the 'InitiateCheckout' event in their session, but did not have the 'Purchase' event.
In your Meta Ads management, go to 'Audiences'. Here you can create a new 'Custom Audience'.
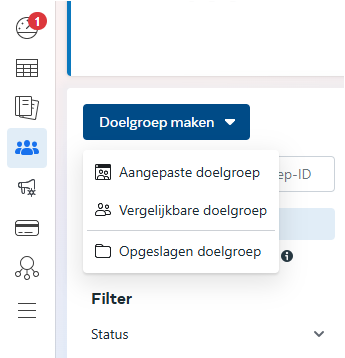
As the source, you choose "Website. Then you select the appropriate pixel and set the appropriate Events you want to retarget on. If you want to retarget on visitors who have had a Lead event, but not a Purchase, that looks like this:
Similar Target Group
Similar Audience (Lookalike Audience) helps you reach new people who are likely to be interested in your business because they are similar to your existing customers. This type of audience is based on custom targeting, using demographics, interests, and behaviors to find people with similar characteristics.
When creating a similar target group, you can set a percentage: a smaller percentage gives a stronger match to your source target group, while a larger percentage offers a wider reach. In general, a source target group of 1000-5000 people works well, and you can get better results by using a target group with your best customers.
Important to know:
- You need an existing source target group of at least 100 people from one country.
- You can create up to 500 similar audiences per source target and use several at once in an ad set.
- People in the source target group are excluded from the similar target group, and you can use "Expand similar target groups" to get a wider reach.
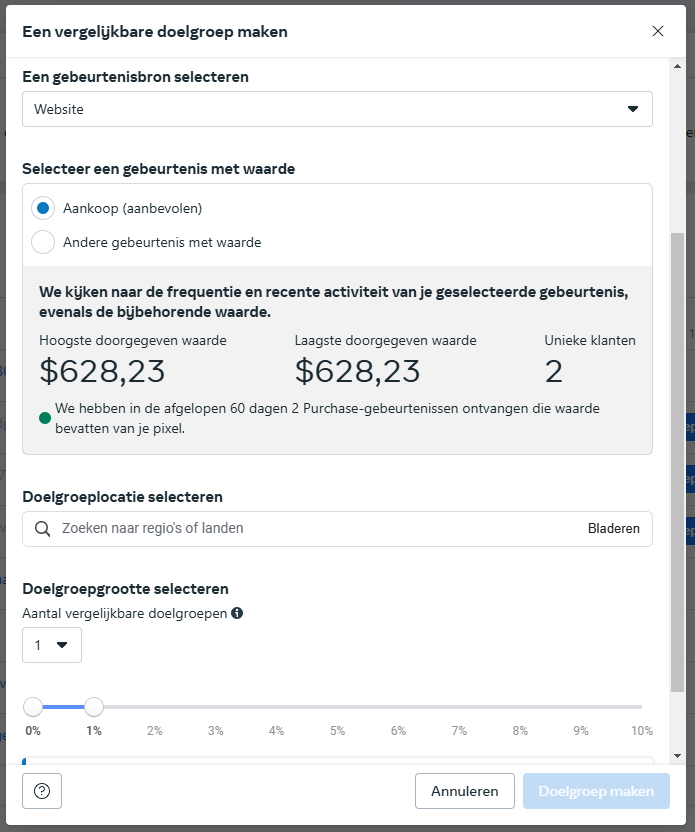
In your Meta Ads management, go to 'Audiences'. Here you can create a new 'Similar Audience'.

There you can select a conversion event based on a source. You can choose the target location and select the target size.
Advantage+ target groups
With Meta Advantage+ targeting, you use Meta's AI to automatically find the best audience for your campaign. Meta's AI constantly learns from data such as previous conversions, pixel data and ad interactions to show ads to the most appropriate people. This, according to Meta, offers better results than other targeting options. So in addition to the data Meta themselves collect on their own platforms in terms of click behavior, finding the right audience also depends on the data Meta receives about your site visitors and what they are performing on your own domain.
Advantage+ audiences work well for most campaign types except remarketing. For sales or traffic goals, Advantage+ campaigns are recommended. Additionally, A/B testing is recommended to help the Meta algorithm compare the performance of different audiences.
For a new campaign, you can specify which audience you want to target at the Ad Set level. There you have the option to select an Advantage+ target group.

Google Ads
Google Ads has a number of rules about the use of first-party and third-party which makes the use of first-party data hugely important for creating audiences and deploying retargeting campaigns, among other things. These are the following rules:
Allowed:
- Using first-party data to create target audiences for ads.
- Segmenting first-party audiences using third-party data. For example, to determine which visitors to your site should be part of your remarketing list.
Not permitted:
- Using third-party data to create target audiences for ads.
- Placing remarketing tags on sites or apps not managed by you, or allowing others to place their remarketing tags on your site to create audiences.
- Sharing user data between unrelated advertisers or companies. This includes sharing or using remarketing lists from other companies.
- Using data from one customer to create a remarketing list for another unrelated customer within the same administrator account.
- Sharing lists between managed accounts unless the user would recognize clear branding agreements between the parties.
Google Ads Data Manager
Data Manager makes it easier to import and use first-party data. The goal is to make sharing and activating this data less complicated through easy-to-use, clickable options. All data management functions are brought together in one place so you can generate more revenue and achieve better results for your business.
Data Manager has the following features that allow you to merge data sources from accounts you can link, your Google tag and the conversions collected:
- Connected products: Contains Google links and external data pipelines. Since there is a known problem with the default Google Ads tag on the GTM server container and co-sending the 'wbraid' and 'graid' parameters, it is often more convenient to use a GA4 import conversion as the primary conversion.
- Google tag: Access and configure your Google tags to measure the effectiveness of your website and ads. Learn more about the Google tag.
You open your Data Manager in Google Ads by going to the Data Manager under "Tools.

Email Marketing Platform
Through certain Email Marketing Platforms, it is possible to receive server-side events. ActiveCampaign/MailBlue, Brevo, Mailchimp and Klaviyo, among others, have this capability. If you forward events based on site interactions to this, you have the ability to send emails based on specific events.
Note that you can only send emails to visitors who have once left their email address on your site. Do you want to send a retargeting email to visitors who fill their cart but do not proceed to purchase? Then you can only do that if you have that user's email address.
Retargeting
Retargeting emails are automated emails sent to visitors who have performed certain actions on your website but have skipped a follow-up step. For example, consider visitors who placed a product in their shopping cart but did not complete the purchase. This process is often referred to as an "abandoned cart" campaign.
The biggest advantage of retargeting emails is that they capitalize on a conversion intent that is already present. This can result in higher conversion rates and more sales. Customers who receive a personalized reminder are more likely to convert after all. Moreover, retargeting emails allow you to capitalize on the customer's personal interests and preferences by showing relevant products or offers.
Practice
- A clothing store sends an e-mail saying, "Your cart is waiting for you!" including an image of the products and a link to go directly to the checkout.
- An electronics shop sends a retargeting email with an exclusive 10% discount valid for 24 hours after a visitor fails to complete the purchase.
- A book website sends a recommendation based on previous searches, such as: "Are you still interested in 'Children and Youth Books'? Available now with free shipping."

Transactional mails
Transactional emails are automated messages sent to customers in response to specific actions or events, such as an order confirmation, requesting a password reset or subscribing to a newsletter. These emails contain important information and usually have a high opening rate because they serve a direct functional purpose.
These emails increase customer satisfaction and enhance the customer experience. They provide customers with the information they need at the right time. Moreover, you can use transactional emails to include subtle marketing messages, such as additional product recommendations or promotions.
Practice
- A customer receives a confirmation email immediately after purchase saying, "Thanks for your order! Here are your order details." Includes a link to track the order.
- When a package ships, a retailer sends an e-mail saying, "Your order is on its way! Click here to track your package."
- After creating an account, customers receive a welcome email with a link to their profile and a recommended guide, "Welcome to our community! Find out how to get the most out of your account."
- A SaaS platform sends a reminder email: "Your trial period is about to end. Click here to activate your subscription."
With well-executed transactional emails, you can not only keep customers informed, but also build trust and loyalty, contributing to a positive brand experience. If your standard transactional emails don't have the ability to add marketing-oriented messaging, you can also send it (additionally) from within your Email Marketing Platform.
.png)
Personalized marketing emails
Personalized marketing emails are emails tailored to a customer's unique preferences, needs or behaviors. Instead of sending a generic message, you use customer data to provide relevant and targeted content. This can range from product recommendations to tailored offers. By offering customers a tailored experience, you increase the likelihood of conversion and build a stronger relationship with them. Plus, the customer feels better understood, which improves loyalty.
Practice
- As a clothing brand, you send an email with a link to a landing page with a quiz that helps your current customers discover which style of clothing suits them best. A customer who prefers "casual" then only receives emails recommending comfortable jeans and sneakers.
- On your site, you have several categories that people can view. If someone views a specific category, that person's email address will also appear on that interest list. All future marketing emails will be targeted to that specific interest.
By combining a quiz on a landing page with personalized emails, you not only make the initial interaction engaging and fun, but also ensure long-term relevance in your communications. This significantly increases the chances of conversion and repeat purchases.


Next steps
Now that you have a solid foundation with Server-Side Tagging, it's time to make the most of it. After all, a good tracking setup and accurate data is just the beginning. Use your first-party data collected through your tagging setup to build targeted marketing campaigns and continually optimize your website. By embracing the value of accurate data and improved tracking, you can take your marketing performance to the next level. Want more ideas and inspiration? Visit our event page and join one of our seminars to get even more inspiration or ideas about leveraging your visitor data!


.png)

.png)
