Looking for a way to measure all your conversions without relying on third-party cookies? Meet the Meta Conversions API and discover how server-side tagging can be a future-proof gamechanger for optimizing your conversion metrics!
In this blog article, I will mainly focus on setting up the Meta Conversions API via Server-side tagging. I will discuss the benefits of Server-side tagging and explain step-by-step how to implement the Meta Conversions API to collect 100% of your conversion data.
Whether you are a marketer, web designer or owner of an online store, understanding and implementing the Meta Conversions API via Server-side tagging can help you optimize your website and gain valuable insights.
What is the Facebook Conversions API?
Measuring and storing data was always done by Meta through a Facebook Pixel on a website. This made it possible for advertisers to apply personalized ads through Facebook. This was possible because Facebook Pixels were installed on so many sites that Facebook could track anyone on the Internet anywhere to analyze and categorize everyone's behavior, interests and entire customer journey. Thanks to Apple's iOS14 update in 2020, it was already no longer possible for Meta to collect data via the pixel on Apple devices. In addition to this iOS update, Google Chrome is also going to stop third-party cookies before the end of 2024 and will be unplugged from Google Optimize after Sept. 30, 2023. These updates are changing the way data processing and cookie tracking is done, requiring alternatives to be found, including Meta.
The Meta Conversions API (Application Programming Interface) is designed by Meta to maintain the direct connection to user data even when they are not on a Meta platform such as Instagram or Facebook. Through the Facebook Pixel, data is sent to the user's browser and sent to Meta from there, but through Meta's Conversions API, data is first sent to a server and from the server that data is sent back to Meta. Because the data is sent to a server, it is considered first-party data as opposed to third-party data.
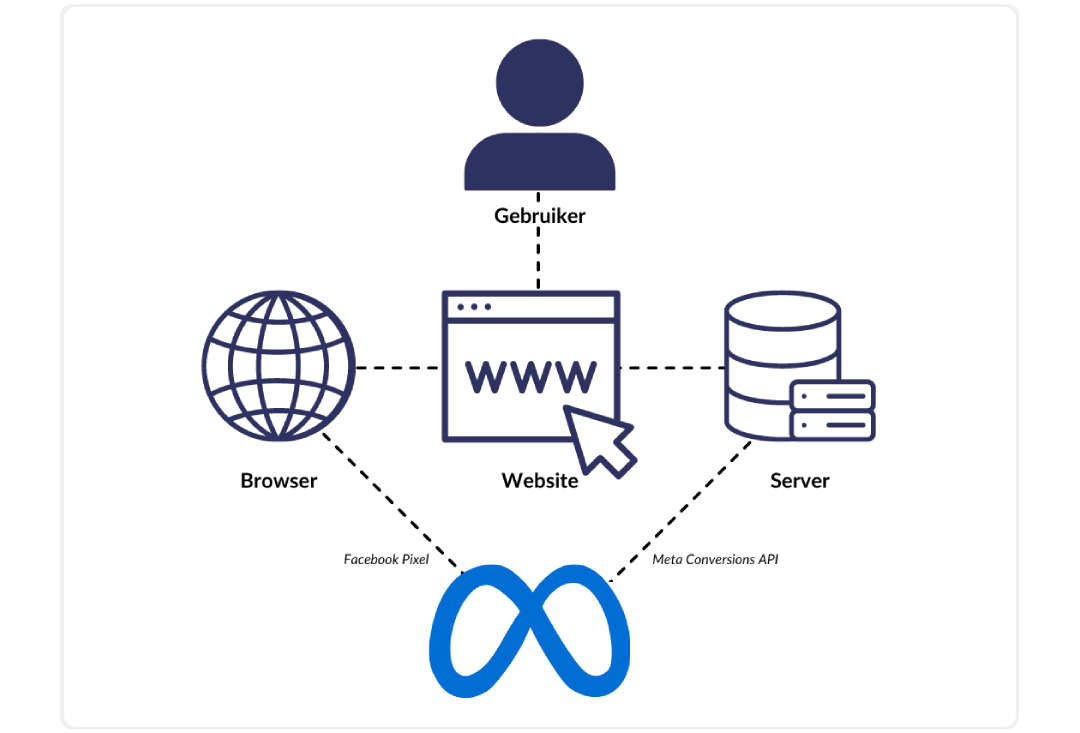
By installing the Meta Conversions API, advertisers can bypass browser blockers, but this does not solve all the problems. In addition to browsers blocking the measurement of conversions, a lot of data will not be measured due to the intervention of adblockers. Meta's Conversion API is a solution to continue measuring data, but as an advertiser, this is not the complete solution. In addition, this API also does not help with the constantly changing European data protection laws (AVG).
The way to use the Meta Conversions API and continue to measure all other blocked conversions is through server-side tagging. By installing a tagging pixel on your website you can stay ahead of adblockers and process your data via Google Tag Manager. Server-side tagging can be set up via Google Cloud, where you pay per gigabyte used for standard storage. With AdPage we offer a cheaper alternative for server-side tagging because we buy our servers in bulk, you save up to 50%.
What is AdPage Server-side tagging?
Server-side tagging is a way of collecting audience data. Unlike Client-side tagging, with Server-side tagging, the data is first sent to your own Web server before being sent to a tracking platform such as Meta, TikTok or Google.
AdPage's server-side tagging script is called first on a website so conversions cannot be missed due to the intervention of adblockers or browsers. In addition, you have control over which tracking platforms can read your data, you can choose which data you share with what. You have full control over all the data you collect on your own server.
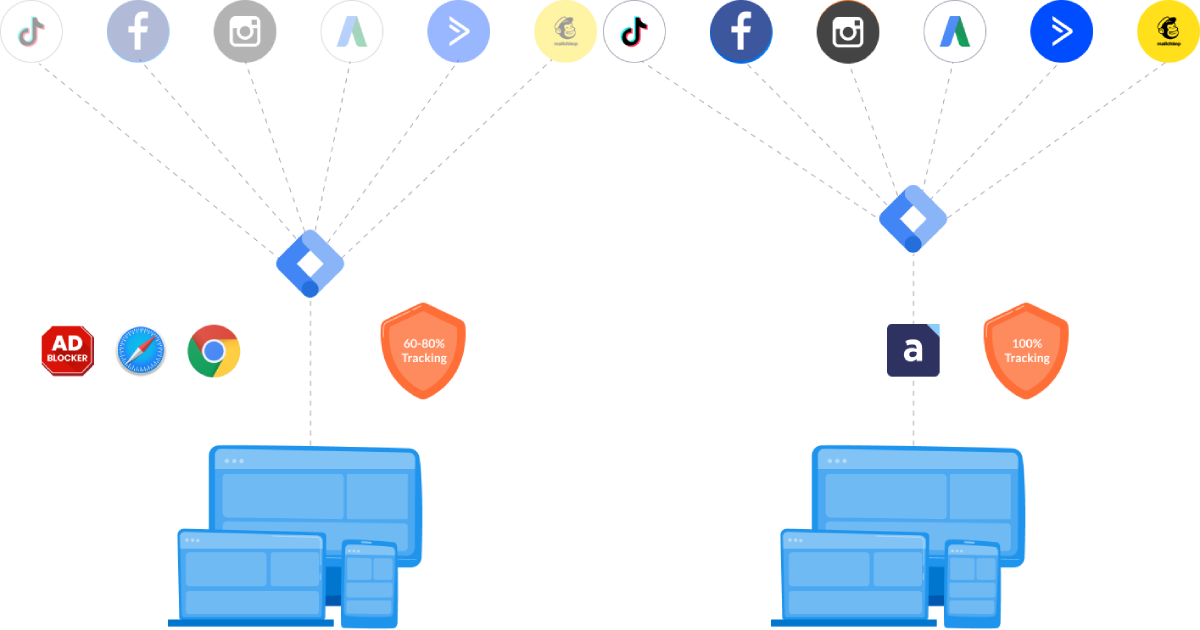
By using a Proxy server through Server-side tagging, no third-party scripts are loaded allowing your data to be sent directly to Google Tag Manager. This makes you compliant with AVG legislation and benefits from private data protection. By anonymizing Personally Identifiable Information (PII) through server-side tagging, you can also give confidence to your customers and consumers. This allows you to run profile-enriching campaigns, track your audience and measure conversions.
Want to learn more about what Server-side tagging is, and what the benefits are for you and your specific situation? Then read this blog article.
Setting up the Facebook Conversion API properly for server-side tagging
There are several ways to configure Meta's Conversions API. For example, on certain platforms such as Shopify and Wordpress, the API can be set up with just a few clicks. But if you want to set up the API via Server-side tagging, there are a number of steps you need to go through.
To set up the Meta Conversions API within Google Tag Manager, though, you will first need to already be able to tag on the web-side and server-side. With server-side tagging, the web container populates the server container by processing data that would normally be executed in a browser. So the appropriate conversion tags within the web and server containers will need to already be in place in order to set up the Meta Conversions API.
How do you set up the API for Shopify and other platforms?
Roadmap to set up Facebook's API
We understand that the paragraphs below may be experienced as gibberish. If you are not familiar with Google Tag Manager, we recommend reading this blog post first.
.png)
First, create a Google Tag Manager account with a web container as well as a server container. Already have a Google Tag Manager account but no server container yet? Then just create a server container. Go to tagmanager.google.com and create an account.
.png)
Name the account, and choose the country. Name the container, and choose Internet as the target platform.
.png)
Within the same account, you now create another new container, a server container this time.
.png)
This time choose Server as your target platform.
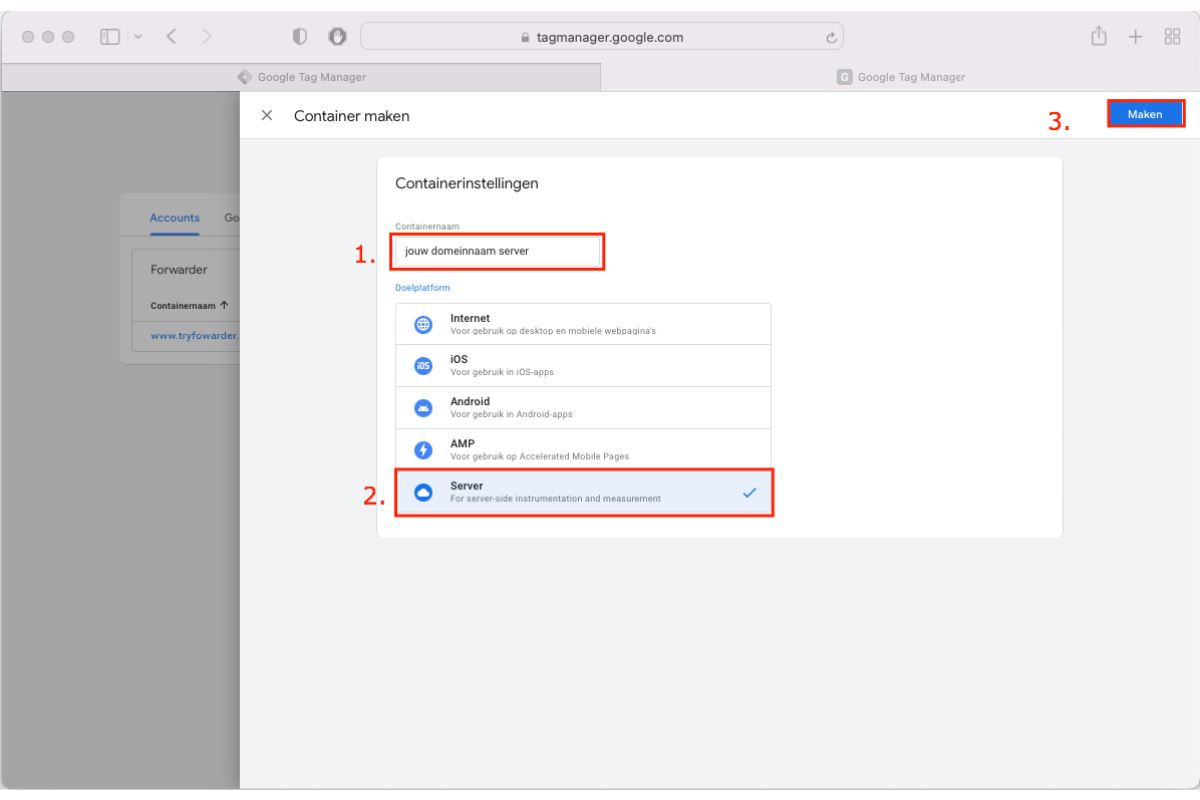
Within the created server container, go to Administration and click Set up Google Tag Manager.
.png)
Select Set up tag server manually and copy the container configuration code.
.png)
Go to trytagging.com and create an AdPage Tagging account here.
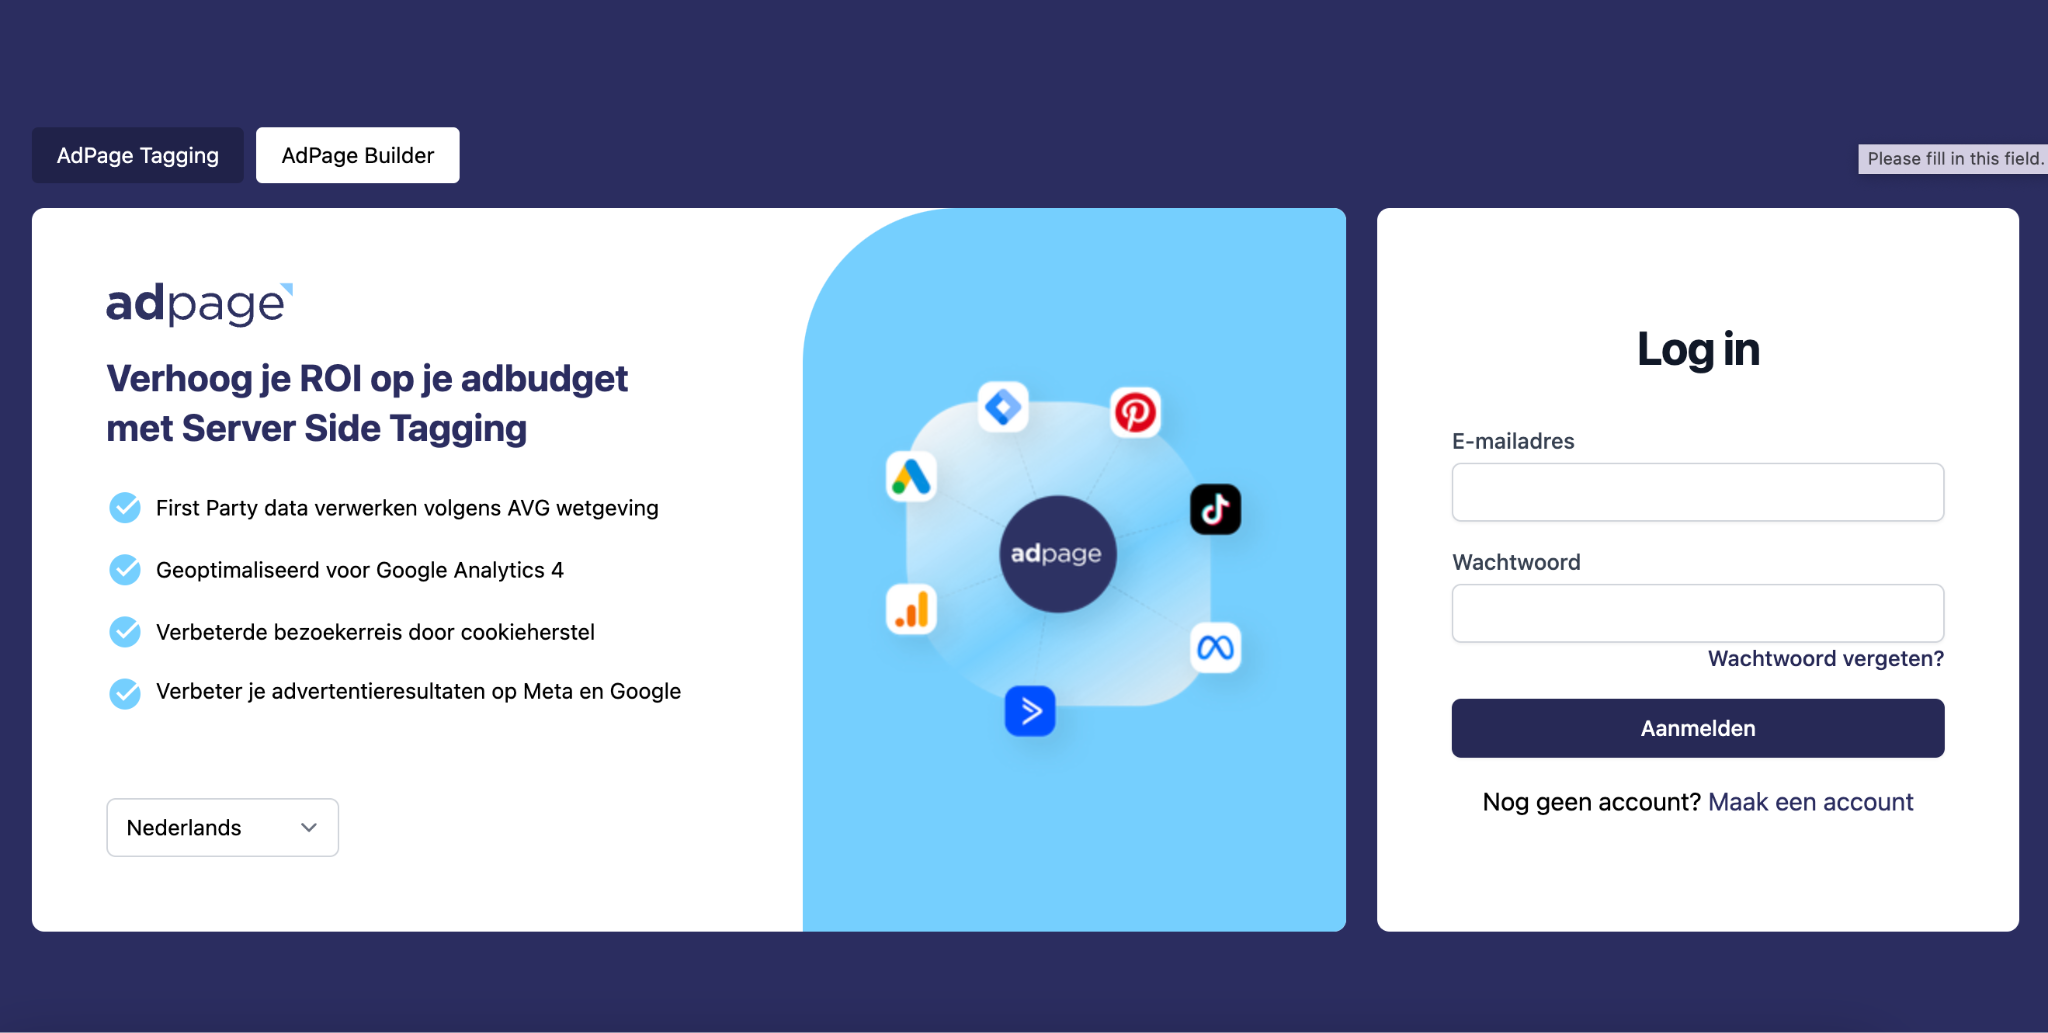
Create a new sGTM Container and paste the copied container configuration code into the appropriate box. In addition, give the container a name and enter the appropriate domain, this domain is a subdomain such as for example: tagging.yourdomain.com.
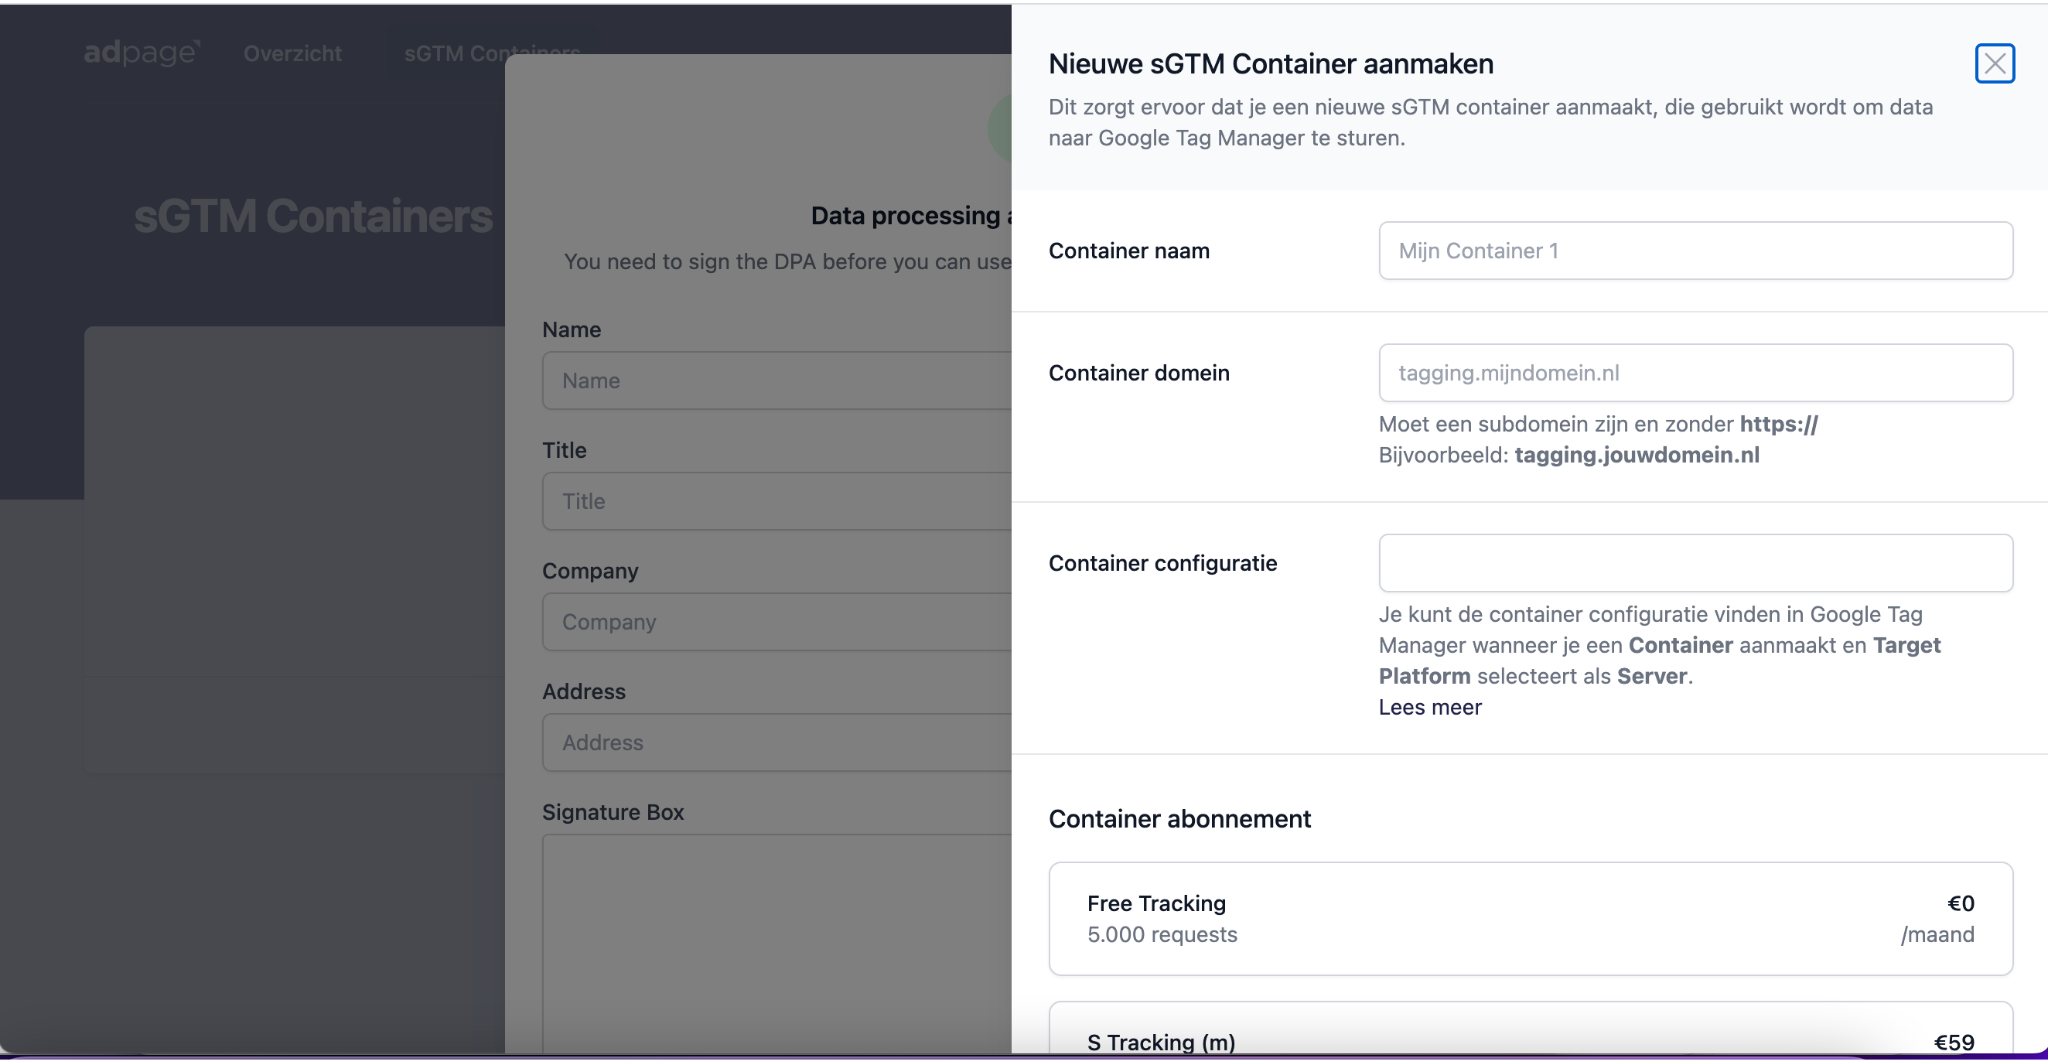
Now you will need to link this tagging container to your own subdomain via the DNS CNAME. Within trytagging.com you can see which subdomain you have created. The CNAME value is always projects.trytagging.com.
.png)
In the five helpdesk articles below we have explained how to link the CNAME for five different domain name providers. If your domain name provider is not listed here you will have to contact the helpdesk of your own domain name provider.
MineDomain】.
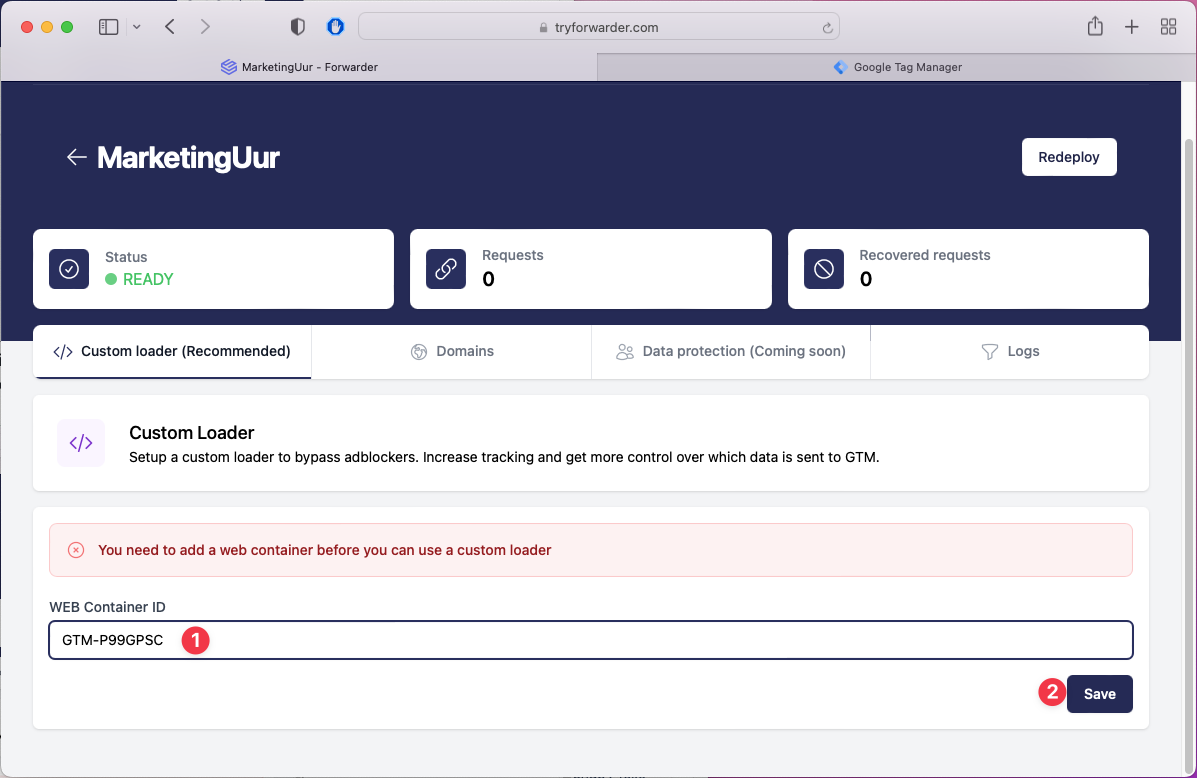
At trytagging.com, you can now create the Tagging Pixel. Select the appropriate container and enter the WEB Container ID. The WEB Container ID can be found within your Tag Manager account. This is the Container ID of your web container.
.png)
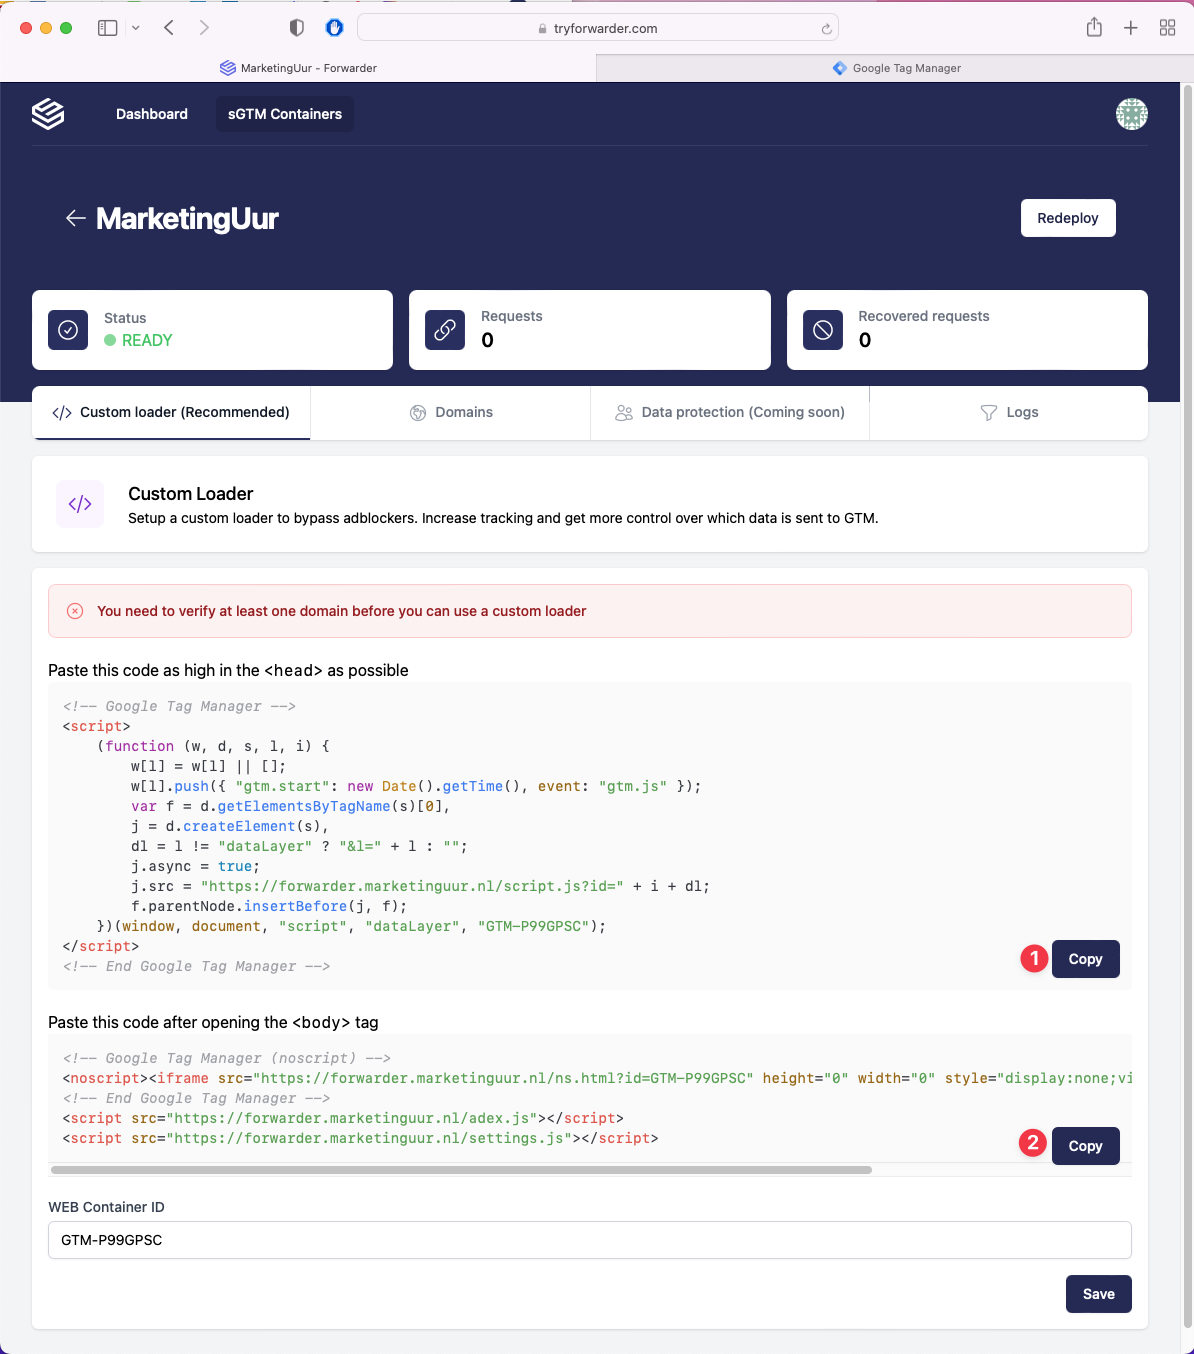
Er wordt nu html-code gegenereerd wat je zowel in de <head> als in de <body> van je site moet plaatsen.
Purchase event via Shopify Webhooks
If you want to measure conversions via Shopify you will send the measured data to Tag Manager via webhooks. You do this by first going to settings and notifications within Shopify.
.png)
At the bottom of these settings, you can find Webhooks.
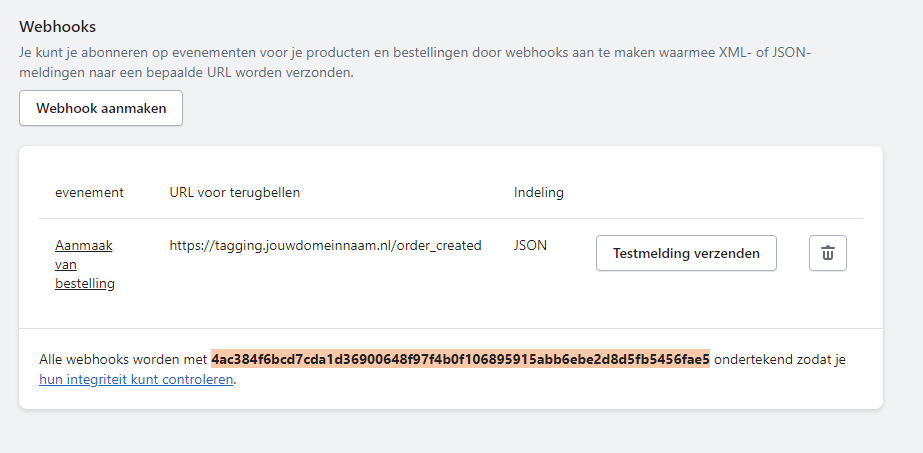
As you can see in the screenshot above, a webhook has already been created. This webhook is activated at the event "order creation" and sends the data to the URL you see behind it in JSON format. You can also create it yourself by clicking on "Create webhook".
As the event, choose "Create order."
As the format, choose "JSON."
At URL, enter your tagging container URL with a recognizable slug, so for example, "https://tagging.jouwdomeinnaam.nl/order_created."
At API version webhook, choose the newest option.
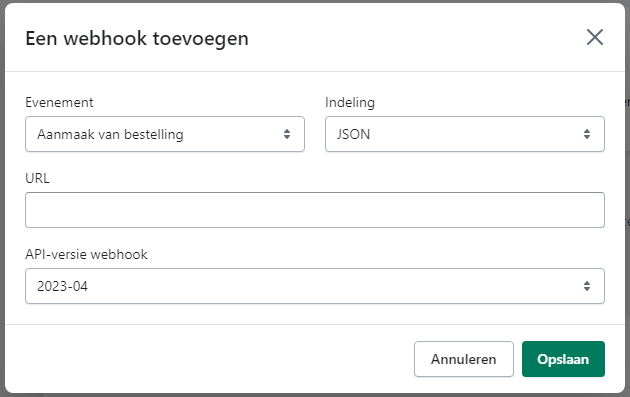
For this webhook to communicate with Google Tag Manager you will need to use the right template. We have prepared a number of templates that you can find within our help desk, including the Shopify webhook templates. Download the appropriate JSON file and upload it within your Tag Manager account.
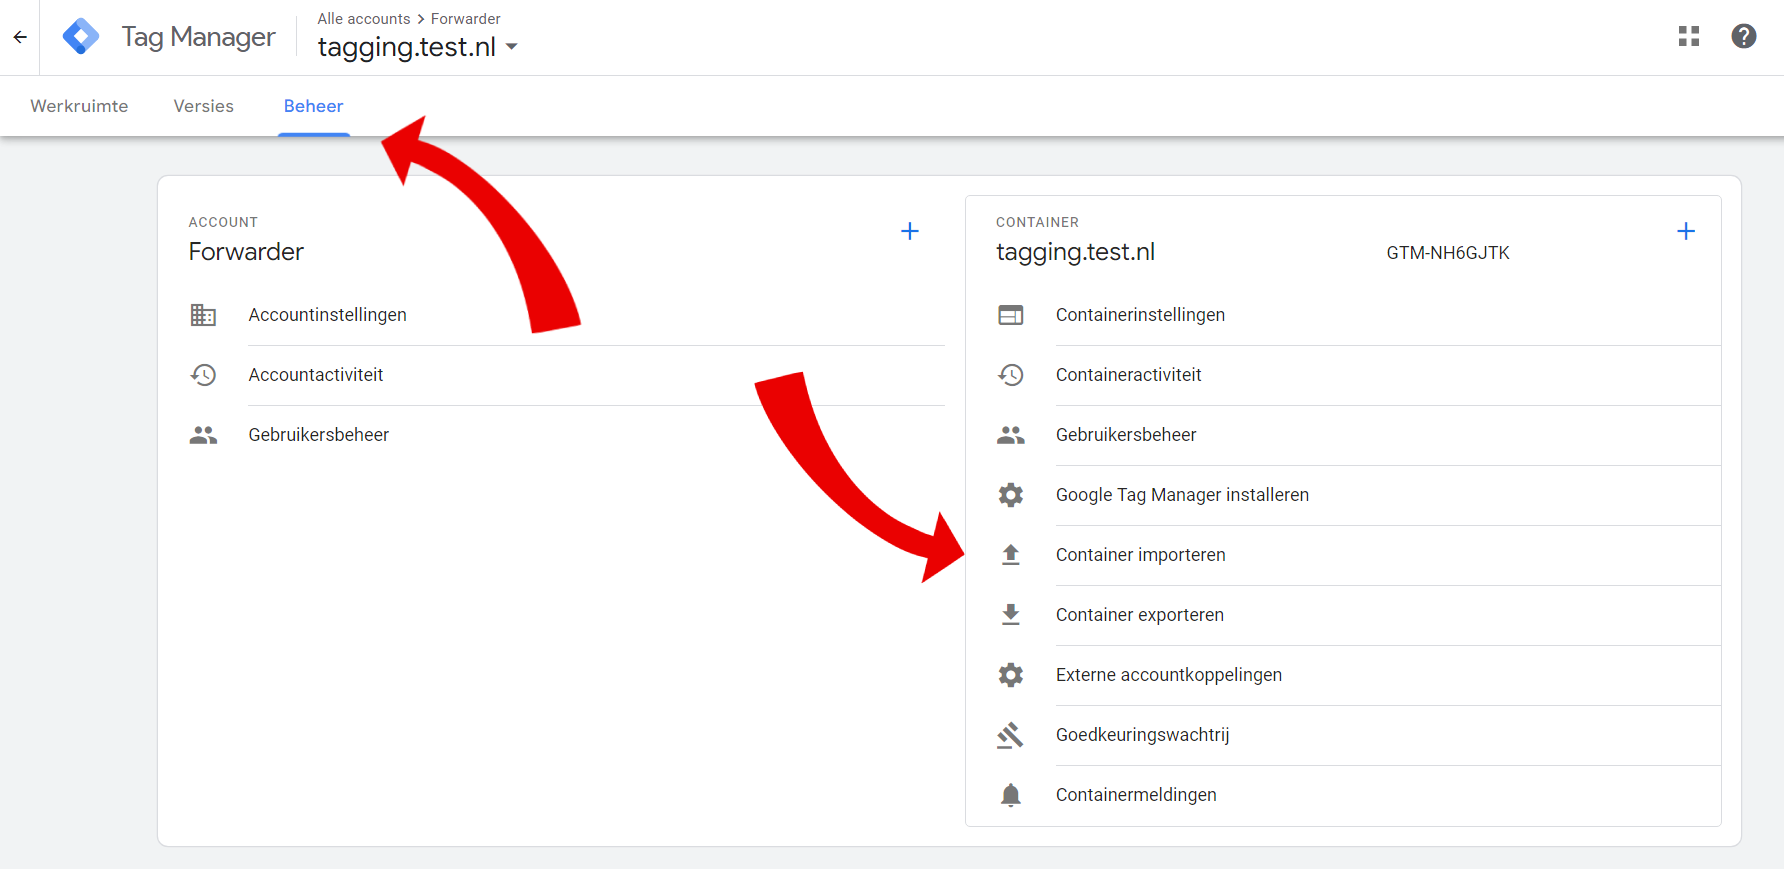
Within your server container, go to "Manage" and "Import Container.
Click 'Choose container file' to import the correct JSON file here.
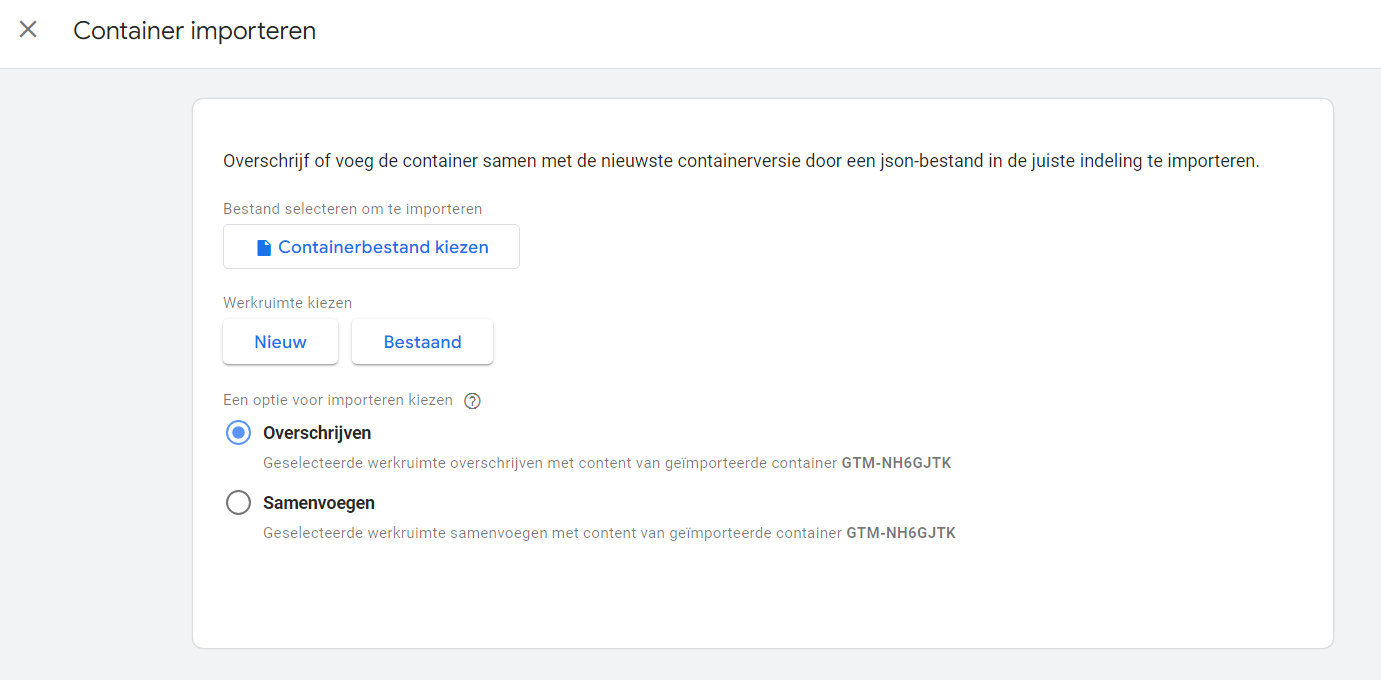
After this, select the appropriate workspace where you want to place the tags, variables, triggers, etc. This is most likely an 'existing' workspace.
Then select whether you want the import to overwrite or merge your Tag Manager components. If you have (virtually) nothing in your server container, choose 'Overwrite'. Otherwise, choose 'Merge' and then select 'Change names of conflicting clients, tags, transformations, triggers and variables'.
.png)
Click "Confirm.
Now tags, triggers, variables, etc. are automatically created. But these still need to be supplemented with your data.
In the new tag 'Facebook Conversion API purchase', the variables {{@FB Access Token}} a {{@FB Pixel ID}} are called.
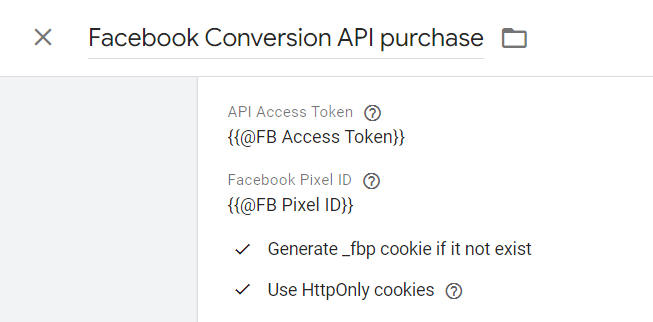
Go to 'Variables' within your server container and find the '@FB Access Token' variable. Within the variable configuration there is now the value 'FB token', but this should become your Facebook Access Token.
You can find those by selecting the pixel within Meta Event Manager and going to settings. Here you can find the Conversions API section. Click on "Generate access token" and follow the steps in the popup.
.png)
Within 'Variables' now click on the '@FB Pixel ID' variable. Within the variable configuration, there is now the value 'PixelIDFB', but this should become your Facebook Pixel ID.
You can find those by opening your Business Settings in your Business Manager and clicking on Event Management (Data Sources).
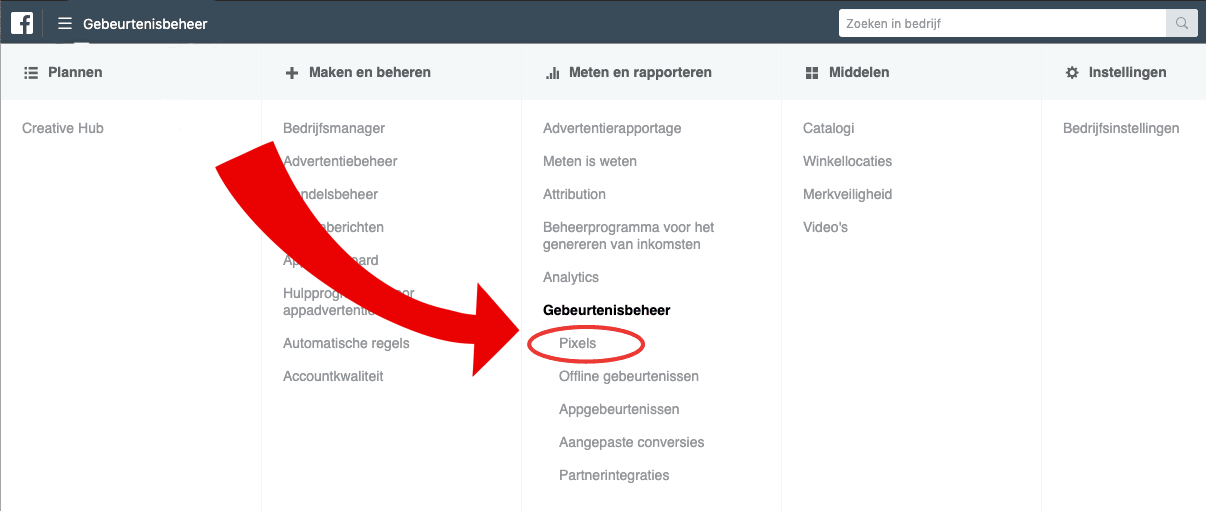
Conversion API Tag
Within your server container, you can also add a Facebook Conversions API Tag template to your workspace. Through this standard way, you're going to get just a bit more results but less accurate than with webhooks. We recommend applying it through the above way and not this way.
You do this by going to "Templates," and here under the heading "Tag Templates," "Search Gallery.
.png)
Using the search bar, you can find the Facebook Conversions APItemplate from "facebookincubator," and add it to your workspace.

We are now going to add this tag template to a new Tag. You do this by going to 'Tags' and creating a new tag.
.png)
Give this Tag a clear name at the top left, such as "Meta Conversion Tag" for example. Then click on "Tag Configuration" and select the Conversions API Tag as the tag type.
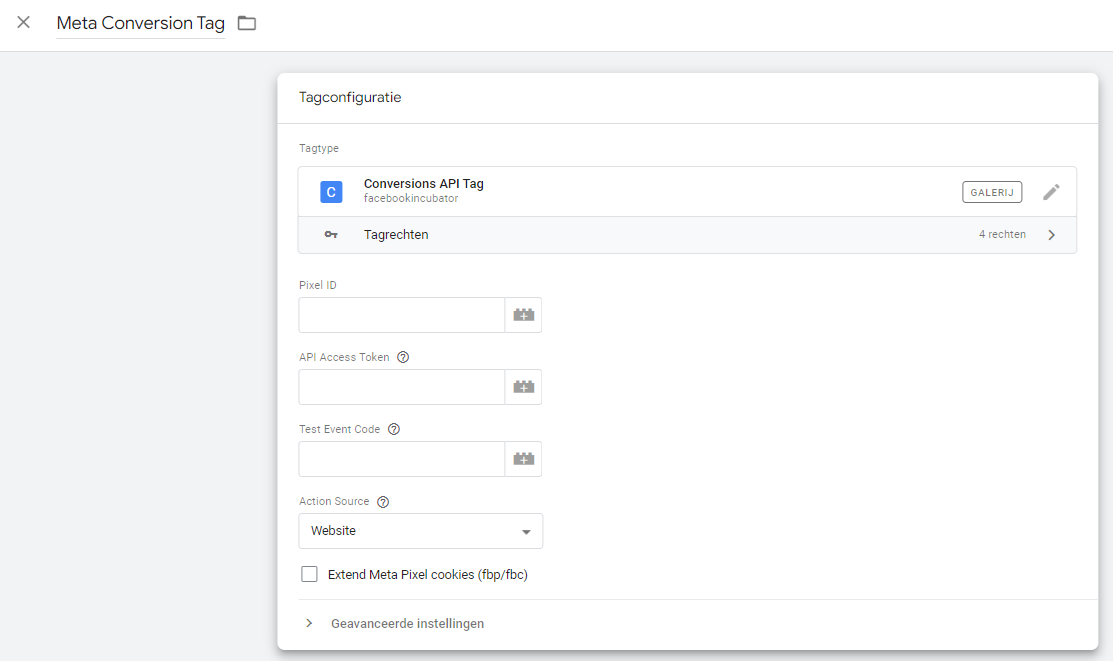
Under Pixel ID, enter your Meta Pixel ID. You can find it by opening your Business Settings in your Business Manager and clicking on Event Management (Data Sources).
Under API Access Token, enter your Meta Access Token. You can find it by selecting the pixel within Meta Event Management and going to settings. Here you can find the Conversions API section. Click on "Generate access token" and follow the steps in the popup.
.png)
Click on 'Triggers' and click on the blue plus in the upper right corner. Name this new trigger in the upper left corner, and click 'Trigger Configuration'. Select 'Custom' from the list of trigger types. Check 'Some events.' The prerequisite is that the 'Client Name' must be equal to 'GA4', assuming you have set up the Google Analytics 4 configuration and tags in your Tag Manager account correctly.
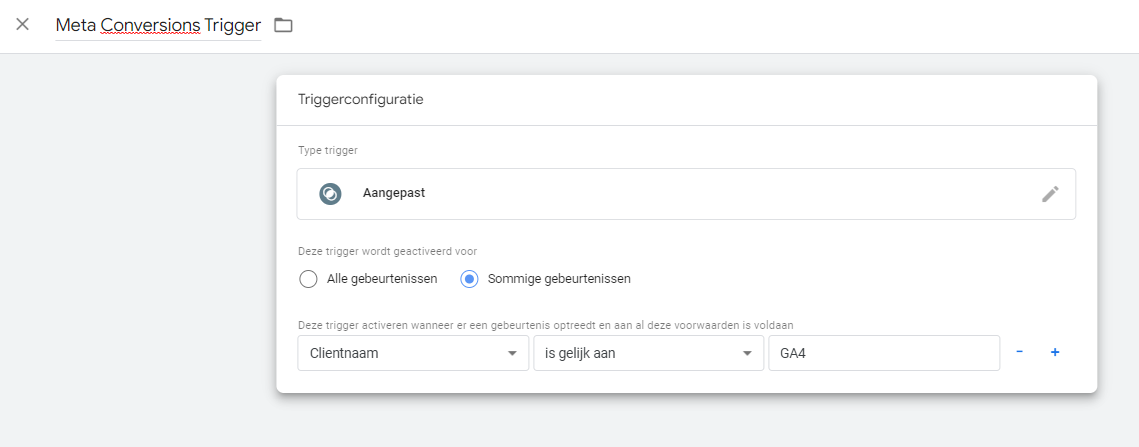
Save the trigger. Save the tag. As a test, you can use the preview mode to see if you have everything set up correctly. Click on "Preview" in the upper right corner. Your site opens and when you perform an action that should be measured via GA4, you can see in preview mode that your Meta Conversions Tag is also triggered.
Want a more detailed explanation of the Meta Conversions API's additional intellings in Google Tag Manager, how to conditionally trigger and what parameters you can set? Then check out our help desk article. Or if you have other questions about Server-side tagging, please contact us at support@adpage.io.
Want to get in touch with AdPage tagging specialists to see if your business needs Server-side tagging? Then schedule a demo!


.png)
