

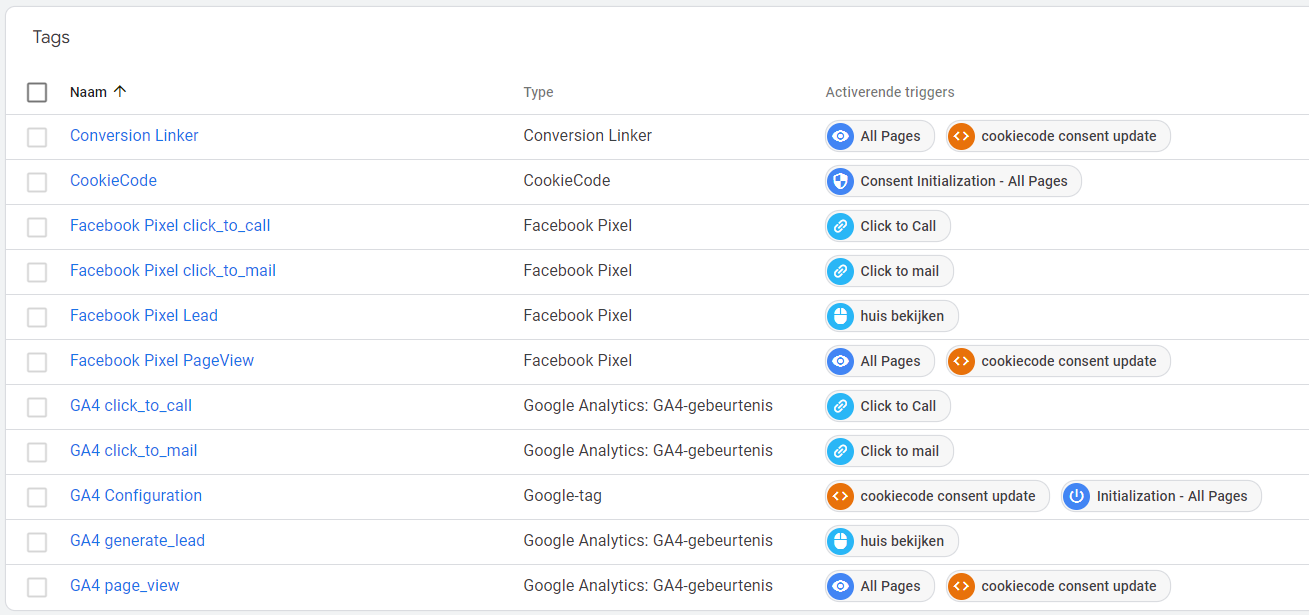
.png)

.png)

Online privacy is a hot topic. With Google Consent Mode v2 and AVG regulations, more and more sites are starting to move to a functioning cookie banner. Sites need to be transparent about their data collection and make sure they comply with applicable privacy laws. To do this, sites use a Consent Management Platform (CMP). But a functioning cookie banner can also create complications with your tracking setup. There are now additional components that can conflict with your tracking setup, including your Server-Side Tagging setup. In this blog article, we dive deeper into the theory behind setting up a CMP through Google Tag Manager (GTM) in conjunction with Server Side Tagging.
Consent Management Platform
Why do you need a Consent Management Platform?
A CMP allows users to maintain control over their personal data. A cookie banner allows users to indicate their preferences for different types of cookies, such as analytical, functional and marketing cookies. This is not only important for transparency, but also for compliance with laws and regulations such as the AVG (General Data Protection Regulation).
How do you set up a cookie banner?
A cookie banner is what a visitor sees on a website. It is a simple tool that informs website visitors about the use of cookies and asks them to accept certain cookies. A cookie banner is technically the front end of your CMP. A visitor should be able to refuse cookies through the cookie banner. In addition, the visitor must be given a choice between different cookie categories such as marketing cookies, analytical cookies and functional cookies. Explanations on the legal requirements can be found at the Authority Consumer and Market (ACM).
In addition, there is one important aspect of the cookie banner that is often overlooked because this part is not a requirement. Cookie banners are often too easy to ignore. Visitors can use all features of the site and can browse different pages even though they have not yet given their consent. Your tracking setup is held up until this permission is given, so it is critical that someone gives this permission on the first page of the first session so the UTM parameters and referrer can be read, among other things.
.png)
Be careful not to use nudging when customizing your cookie banner. Nudging is influencing choice. Changing the environment of choice to subconsciously direct your site visitors toward an outcome (desired by you) is not permissible. When you make the 'accept all cookies' button bright green and give the 'decline all cookies' virtually the same color as the background and also make the text unreadable, you are nudging your users. View the image below for an example of a cookie banner that is nudging. If your cookie banner looks like this, it's time to think about a new layout.
.png)
Read the following article from the Personal Data Authority on formatting your cookie banner.
The role of Google Tag Manager
A tag management system is an indispensable tool these days if you want to accurately track your site visitors via Server-Side Tagging. With a tag management system like Google Tag Manager, you are responsible for managing your tags and scripts yourself without having to modify parts of the site code or having knowledge of HTML. This simplifies making changes and provides better organization and control of your tracking setup.
In the context of a Consent Management Platform, Google Tag Manager plays a crucial role. Through GTM, you manage your tracking setup and will have to set what is and is not allowed to be activated from your tracking setup based on your visitors' consent. Thus, if a site visitor refuses marketing cookies but allows analytics cookies, you may have the tags activated for analytics platforms like Hotjar or Google Analytics 4 but not for marketing platforms like Meta Ads or LinkedIn Ads. Setting up these settings, the consent overview settings within Google Tag Manager, is simple, but continuing to measure your visitors correctly with these new consent settings is a more difficult puzzle.
For some CMPs, it is possible to load them from within Google Tag Manager. This is possible for Cookiebot and Cookiecode, among others. Indeed, in Google Tag Manager there is one page load trigger specifically meant for loading a CMP and cookie banner. That is the 'Consent Initialization' / 'Initializing consent' trigger. This loading step is the very first step of every page and is specifically reserved to load a CMP or cookie banner so that no other tag can be fired yet as long as no consent has been given by a visitor.
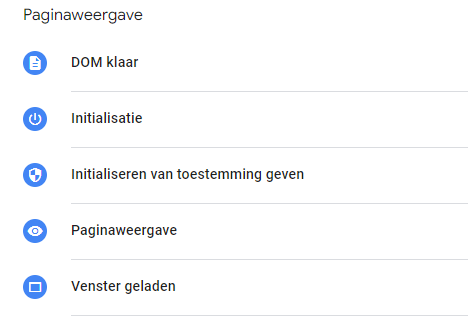
What are the steps involved in a pageload?
1. Initializing consent -> to load a CMP.
2. Initialization -> before the page starts loading
3. Page view -> when the browser starts loading the page
4. DOM ready -> when the HTML has finished loading
5. Window loaded -> when all scripts and images are loaded
GTM Consent Overview settings
When you have your CMP loaded at the very first step of a page load, you will need to set it to (partially) block all other tags as long as no consent has been given. You do this easily within Google Tag Manager with the Consent Overview settings.
Through these settings you can specify for each different tag what given consent is needed from the visitor to allow that tag to fire. The different consent types on which you can indicate this are:
- ad_storage
- analytics_storage
- functionality_storage
- personalization_storage
- security_storage
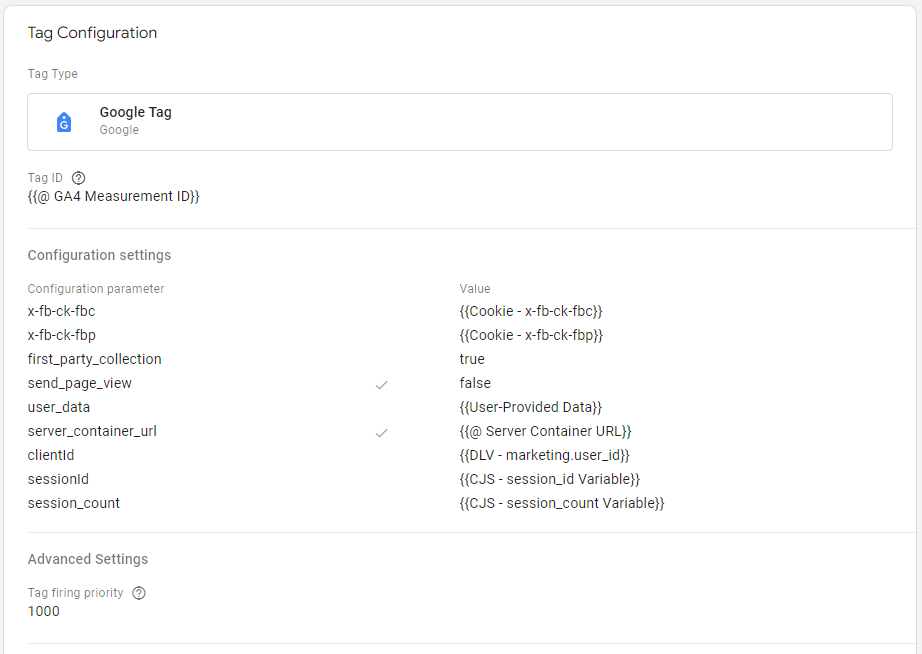
In addition to the above additional consent that a tag needs to fire, Google Tag Manager also uses Built-In Consent Checks. These are set by default for all Google tags such as the Google Tag, GA4 Event Tags, Conversion Linker, Google Ads Conversion Tracking Tags. These built-in consent checks mean that Google's tags are consent-aware. These tags have built-in controls for analytics_storage, ad_storage, ad_user_data and ad_personalization.

Follow these steps to apply the Consent Overview settings in your Google Tag Manager web container.
Why your unassigned traffic increases in GA4 after setting the Consent Overview settings
When someone lands on your site for the first time ever, they have not yet given their consent. Among other things, the Google Tag and the page_view event tags will most likely already be activated the moment the page loads. Because no consent has yet been given on that first page, these tags are not (fully) activated. In the visualization below you can see why the unassigned increases when you have set up a cookie banner, but have not adjusted all the triggers accordingly. This is because the referrer and UTM parameters of the first page are not registered, and on the second page you lose that information.
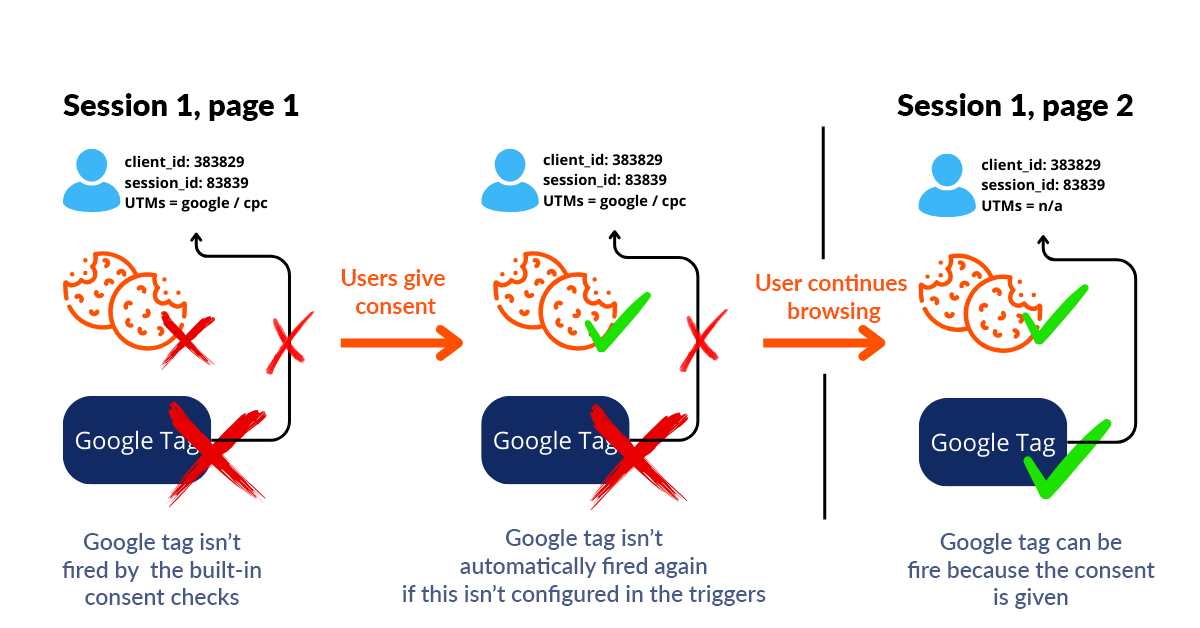
Built-In Consent Checks do allow Google to send cookie-free pings to Google Analytics 4 for their own Google Tag and GA4 event tags, such as the page_view event. These cookie-free pings are an anonymous and non-identifiable Google Analytics event. Cookie-free pings, as part of regular HTTP/browser communication, can only contain the following visitor-identifying information: user-agent, screen resolution, IP address. This allows GA4, through their behavioral modeling, to still provide a good estimate of how many users were on your site, what steps they performed, and where all your visitors likely came from.
But if you want certainty about your visitors and where they are coming from, you will need to ensure that the Google Tag and the GA4 page_view event tag are fired on that first page of the first session after the visitor's consent is given.
Adjusting your triggers based on the consent interaction
There are two ways to adjust your triggers in your tracking setup based on the consent interaction (accepting or rejecting the cookies via the cookie banner). This varies by cookie banner and Consent Management Platform. Below there will be two different ways explained how to solve this.
- Firing all tags only after the consent update on each page
- Firing all required tags again after cookie banner interaction
Set triggers on consent_update
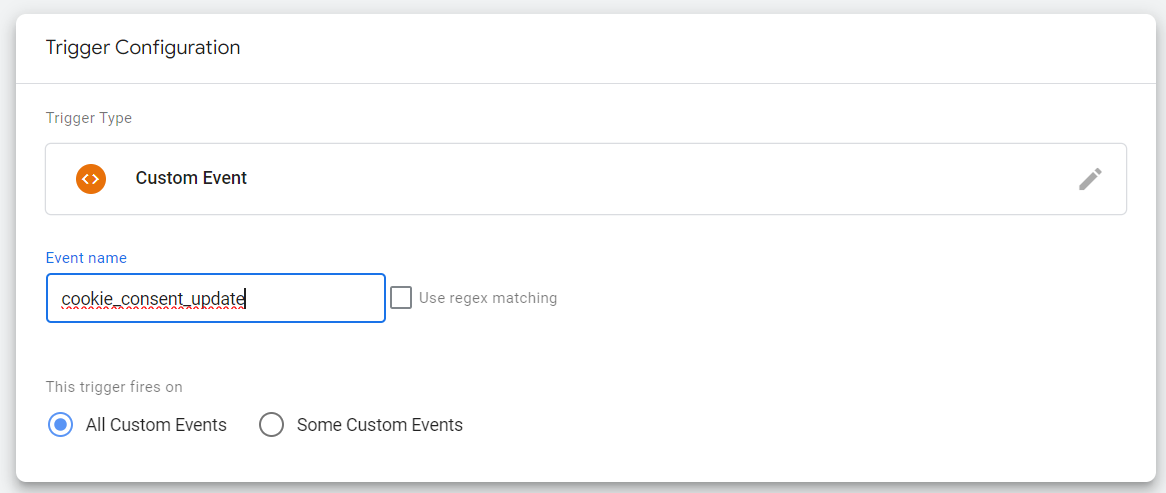
With the CMP Cookiebot, a DataLayer event called "cookie_consent_update" takes place on every page, including on the first page of the first session only after the visitor indicates consent. So if you were to make all triggers wait until this DataLayer event or until after this DataLayer event, you would always be able to retrieve the necessary user and marketing info and pass it on provided the cookies are accepted.
Follow these steps to set up your triggers within the GTM web container for Cookiebot:
1. Create a Custom Event trigger named cookie_consent_update.
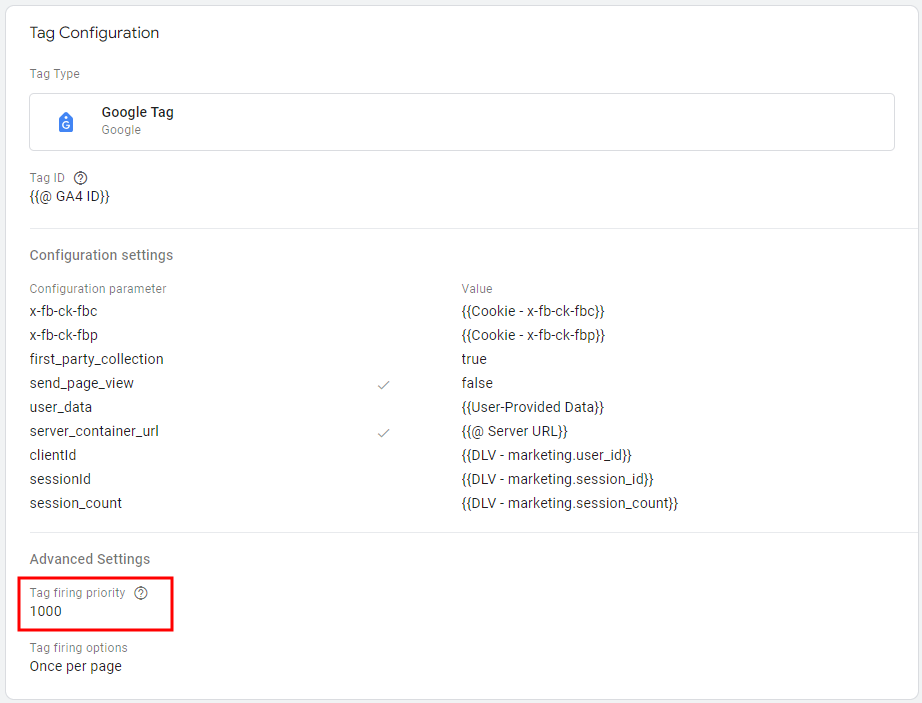
2. Replace the triggers of all the tags that should take place on each page load with this trigger. These are the tags such as the Google Tag, the page_view event tag and the Conversion Linker.
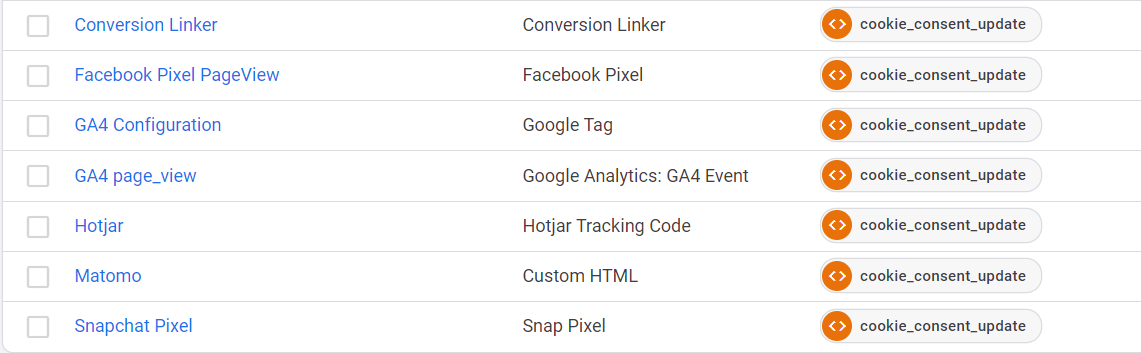
2a. Make sure the Google Tag has priority over all other tags. You do this by setting Tag Firing Priority to 1000 in the tag configuration under "more settings.
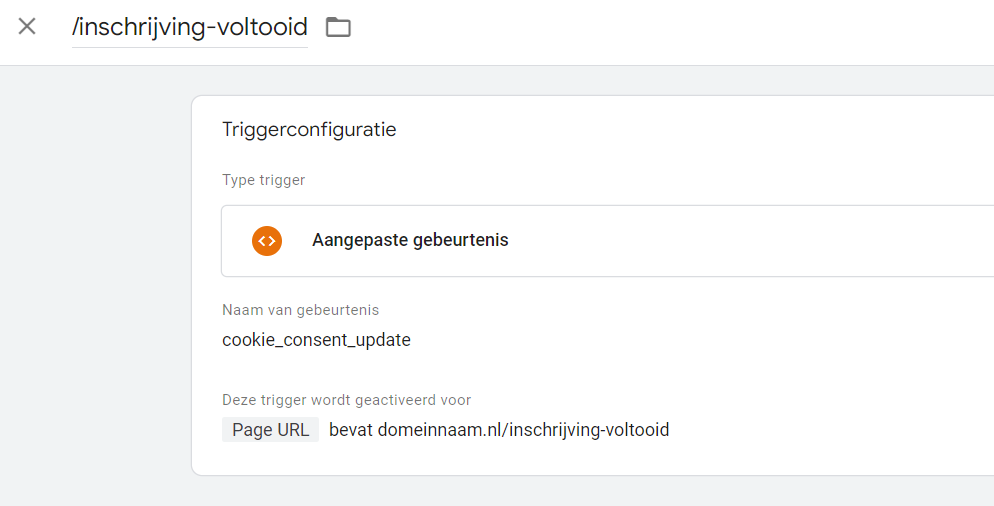
3. Replace the triggers of all tags that can also take place during a page load, for example, all triggers based on thank you pages or based on DataLayer events such as view_item or purchase.
3a. For thank you pages, you can change the trigger configuration to the DataLayer event 'cookie_consent_update' on a specific Page URL.
3b. For other DataLayer events, you can use a Trigger Group. In a Trigger Group you can add two different triggers so that the trigger cannot be activated until both triggers have occurred.

Create additional trigger on cookie banner interaction
With some CMPs like Cookiecode, a DataLayer event occurs once after the cookie banner interaction. So you could add an additional trigger to all tags that trigger on a standard page load so that these tags are triggered twice only on the first page of the first session.
Follow these steps to set up your triggers within the GTM web container for Cookie Code:
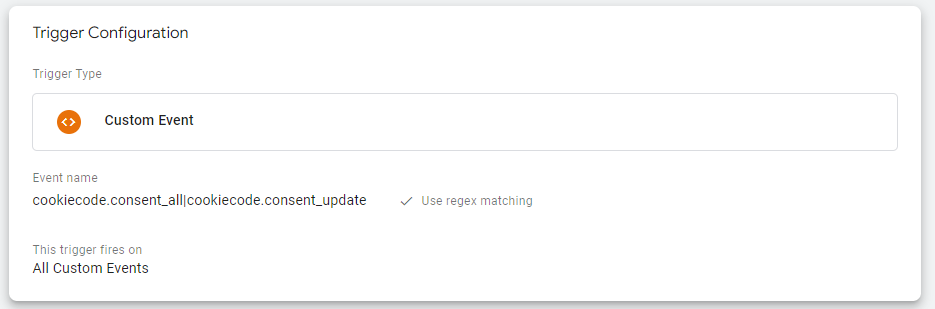
1. Create a new trigger for a Custom Event. Give it the following name: "cookiecode.consent_all|cookiecode.consent_update". Make sure you have 'Use regex matching' turned on.
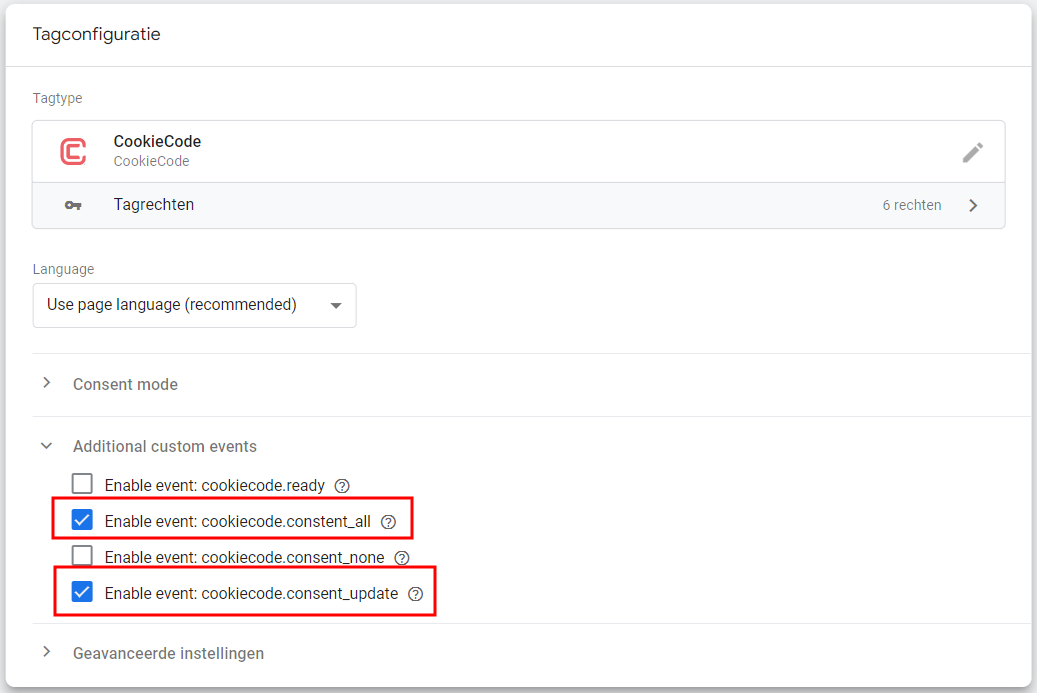
2. Make sure the options below are checked within your Cookie Code tag.
3. Add this new consent update trigger to the Google Tag, page_view event tags and any other tags that trigger on a pageload.
3a. Make sure that these tags you give an additional trigger are not set to 'once per page' but to 'once per event'.

3b. Give your Google Tag the Tag firing priority of 1000.
Checking how to set this for your own cookie banner
With all other CMPs, you will have to check yourself how you will have to set your triggers so that the visitors on the first page of the first session will be tracked properly. Only how do you find out how to set and adjust these triggers?
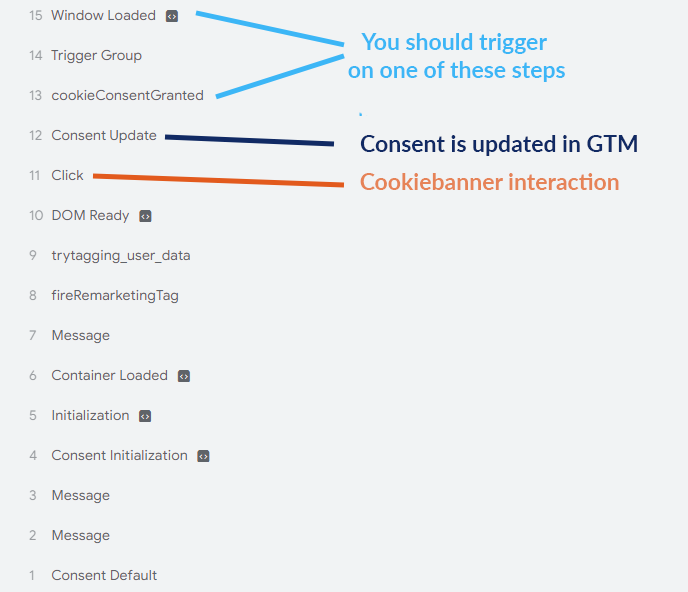
Custom Cookie banner where a DataLayer event occurs every page
1. Open your site in GTM preview mode and make sure you delete your cookies.
2. Accept all cookies and check in GTM what happens after you do this
2a. Thus you could see the following:
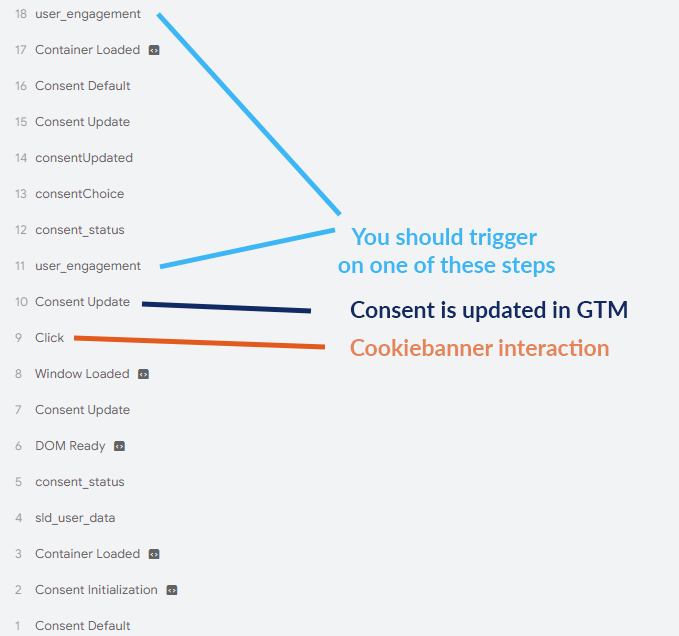
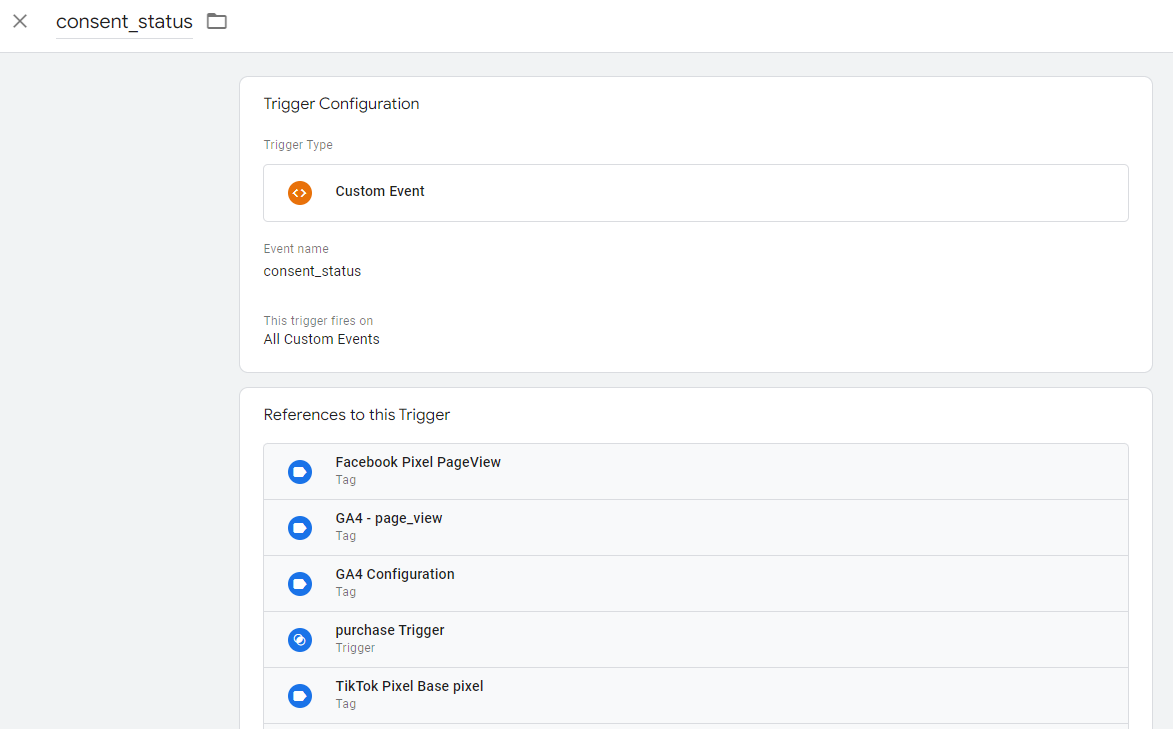
3. So in this situation of could you set this trigger:
Custom cookie banner where you add an additional trigger based on the cookie banner interaction
1. Open your site in GTM preview mode and make sure you delete your cookies.
2. Accept all cookies and check in GTM what happens after you do this
2a. Thus you could see the following:
3. In this situation, you could add the following trigger to all tags on pageload triggers:
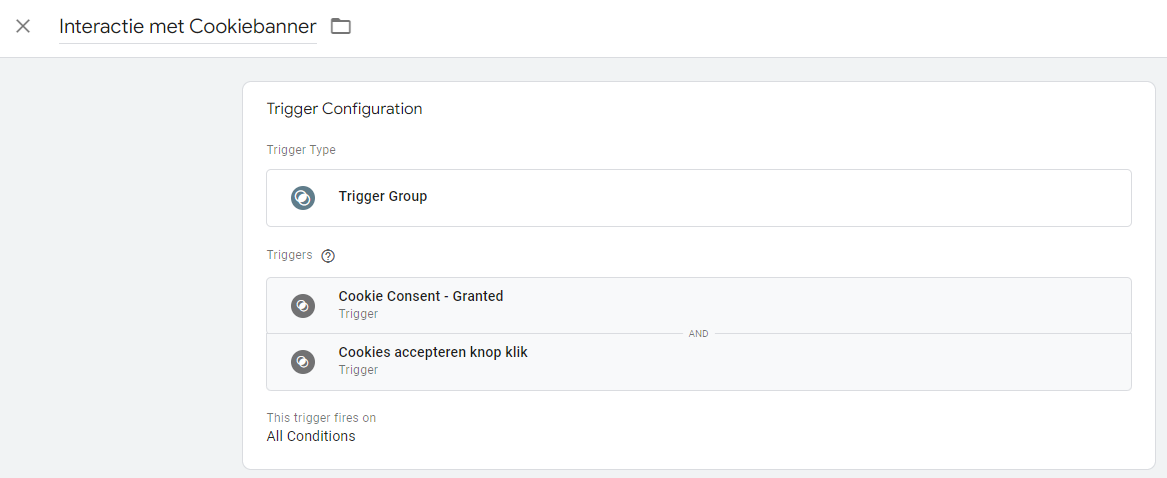
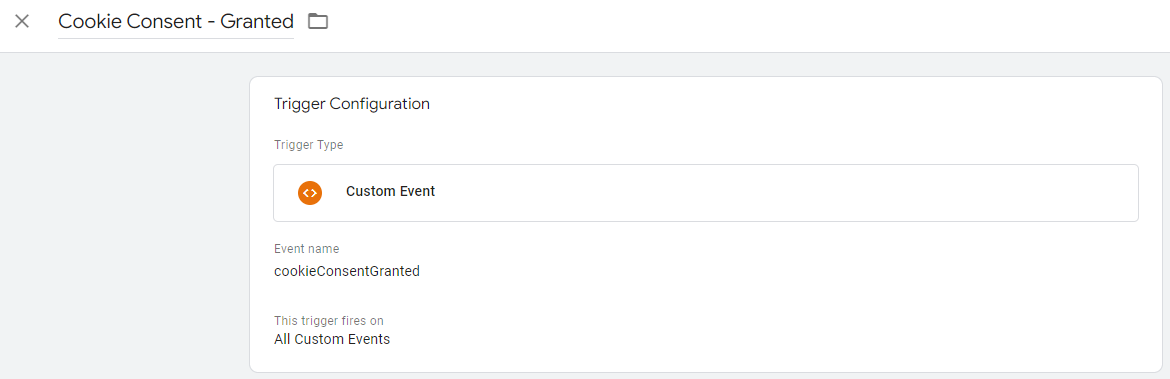
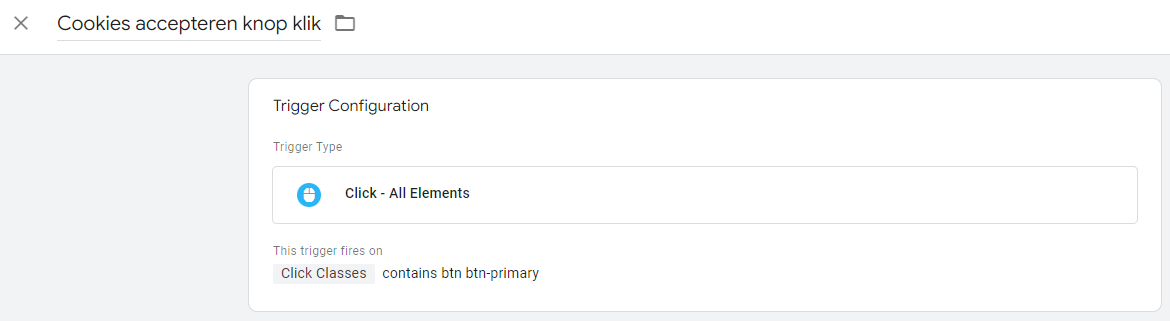
This trigger group consists of the following 2 triggers:
A trigger group is used to ensure that this trigger can never take place based on a DataLayer event without the cookie banner button also being clicked on that page.
Conclusion
Setting up a CMP in conjunction with Google Tag Manager and Server-Side Tagging can be a challenging task, but it is essential for ensuring the privacy of your visitors and collecting data about the origins of your site visitors. If you find yourself stuck at this point or just want to make sure everything is set up correctly, don't hesitate to contact us. We can most easily be reached at support@adpage.io.